How to Make Deposits and Withdrawals on Aster DEX


In questa pagina
- •On Aster DEX deposits are free and you only pay the network gas fee while withdrawals cost $0.10 and are processed almost instantly.
- •Aster DEX supports Ethereum, BNB Chain, Solana, and Arbitrum giving users multiple network options.
- •When using Aster DEX always double check the network and wallet address and use the official site to keep your funds safe.
Aster DEX has been getting attention in the crypto space recently. Binance founder CZ even shared ASTER’s chart, which is rare for him. Launched in July as Aster Chain, the exchange is backed by YZi Labs (formerly Binance Labs) and PancakeSwap, aiming to compete with Hyperliquid in the derivatives market, with trading volume reaching to $1.11B. Here’s a simple guide on how to make deposits and withdrawals on Aster DEX.
Before You Start: What You Need
Before you begin depositing or withdrawing on Aster DEX, make sure you have a few things ready:
1. Compatible Web3 Wallet
Since Aster DEX supports Ethereum, Arbitrum, BNB Chain, and Solana, you’ll need a wallet that works across these networks. MetaMask is the most convenient choice because it supports all four networks in a single interface, saving you the hassle of switching between wallets.
2. Funds in Your Web3 Wallet
There is no direct way to send funds to Aster DEX like a centralized exchange deposit address. You must connect your Web3 wallet (such as MetaMask), then transfer funds from your wallet to Aster DEX using the platform’s deposit function.
Setting Up Your Web3 Wallet
Before you start depositing on Aster DEX, take a moment to decide which network you want to use. Aster supports BNB Chain, Ethereum, Arbitrum, and Solana. Once you’ve chosen your network, the next step is to select a wallet that works with it.
To keep things simple, MetaMask is the recommended choice since it supports all four networks, including Solana after its recent upgrade. If you don’t have MetaMask installed, follow our complete step-by-step guide on how to download and set up your MetaMask wallet before moving forward.
Once your MetaMask wallet is ready, the next step is to make sure it’s configured with the right network. By default, MetaMask is set to Ethereum, but because it supports EVM-compatible networks, you can easily add BNB Chain, Arbitrum, or even create a Solana wallet inside MetaMask. Here’s how to get started with adding BNB Chain:
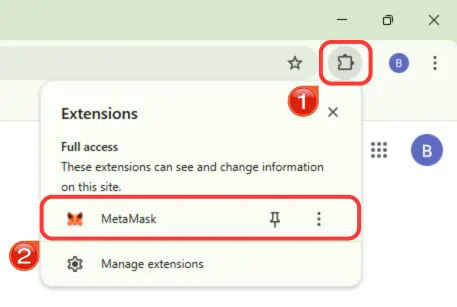
Step 1: Once you’ve created your MetaMask wallet, open the Chrome extension by clicking the “MetaMask” icon next to your browser’s address bar.
Step 2: Click the “Network” dropdown, which you’ll find in the bottom half of the MetaMask extension window.
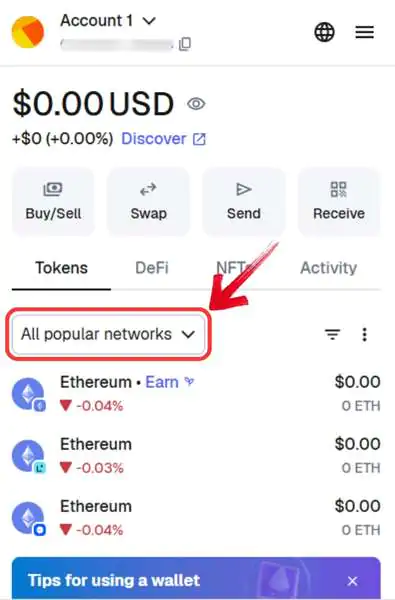
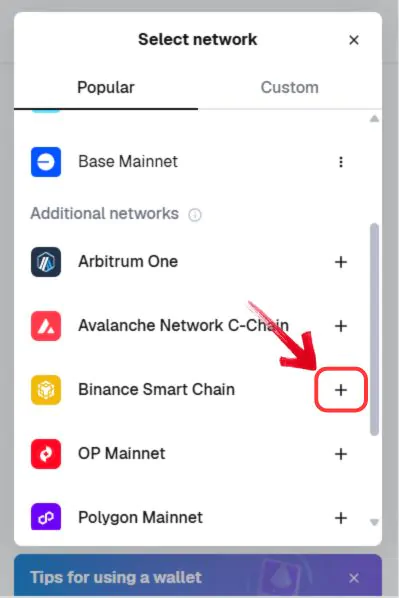
Step 3: Make sure you’re on the “Popular” tab, scroll down, and click the “+” icon next to Binance Smart Chain.
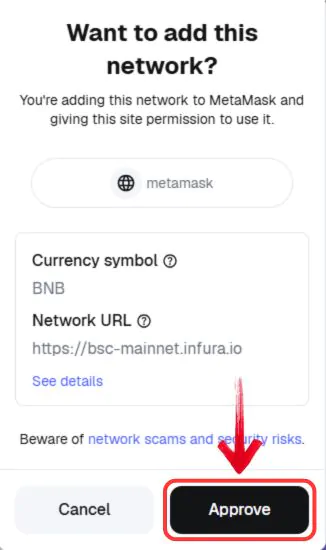
Step 4: Finally, click “Approve” to add BNB Chain to your MetaMask wallet. MetaMask will automatically switch to the new network once it’s added.
Funding Your Web3 Wallet
Let’s start by funding your wallet. This step is essential because before you can transfer funds to Aster DEX, you need tokens ready in your wallet. For this example, we’ll use Binance Smart Chain (BNB Chain) and USDT as our token.
You can buy USDT directly on Binance Smart Chain with a credit or debit card through MetaMask or Trust Wallet, but this service is still restricted in many regions. That’s why, in this guide, we’ll use BloFin exchange to transfer BNB to MetaMask via the BNB Chain, a fast and low-cost option since BloFin supports direct BNB Chain withdrawals.
Here are the steps to fund your MetaMask wallet using BloFin:
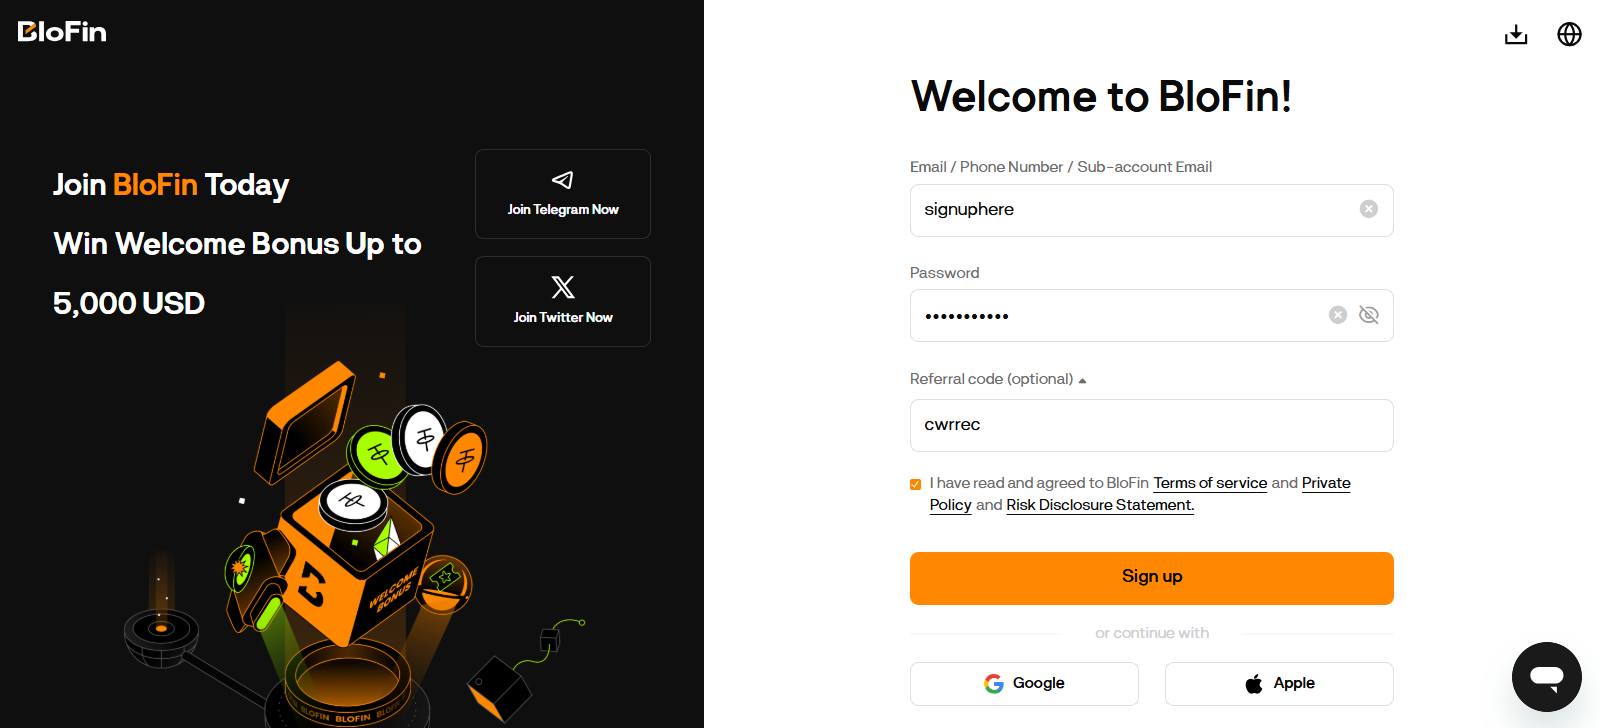
Step 1: Open your browser and go to the BloFin website. Sign up for an account if you don’t already have one.
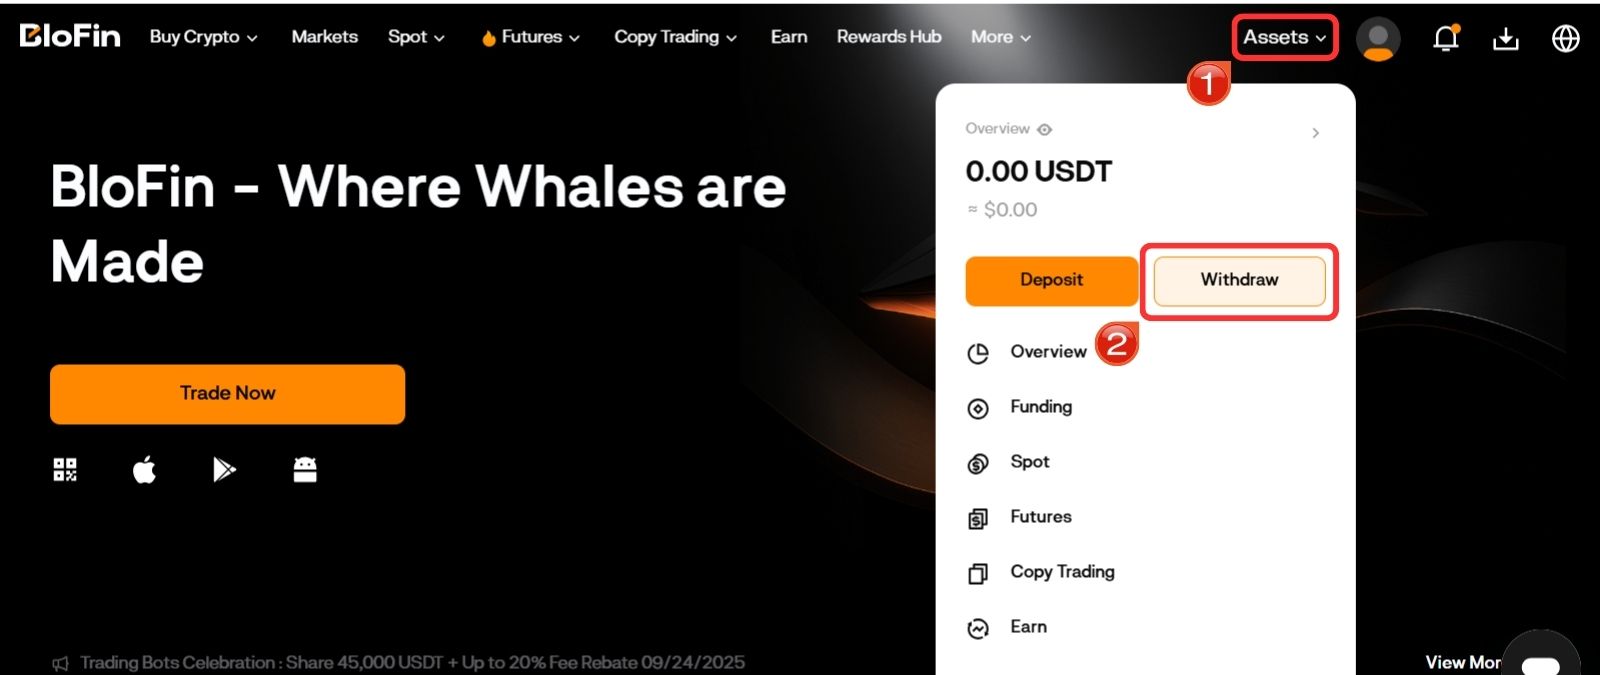
Step 2: Once logged in, click on the “Assets” dropdown in the top-right corner of the toolbar, then select Withdraw.
Step 3: In the “Select Crypto” field, choose BNB as the coin you want to transfer.
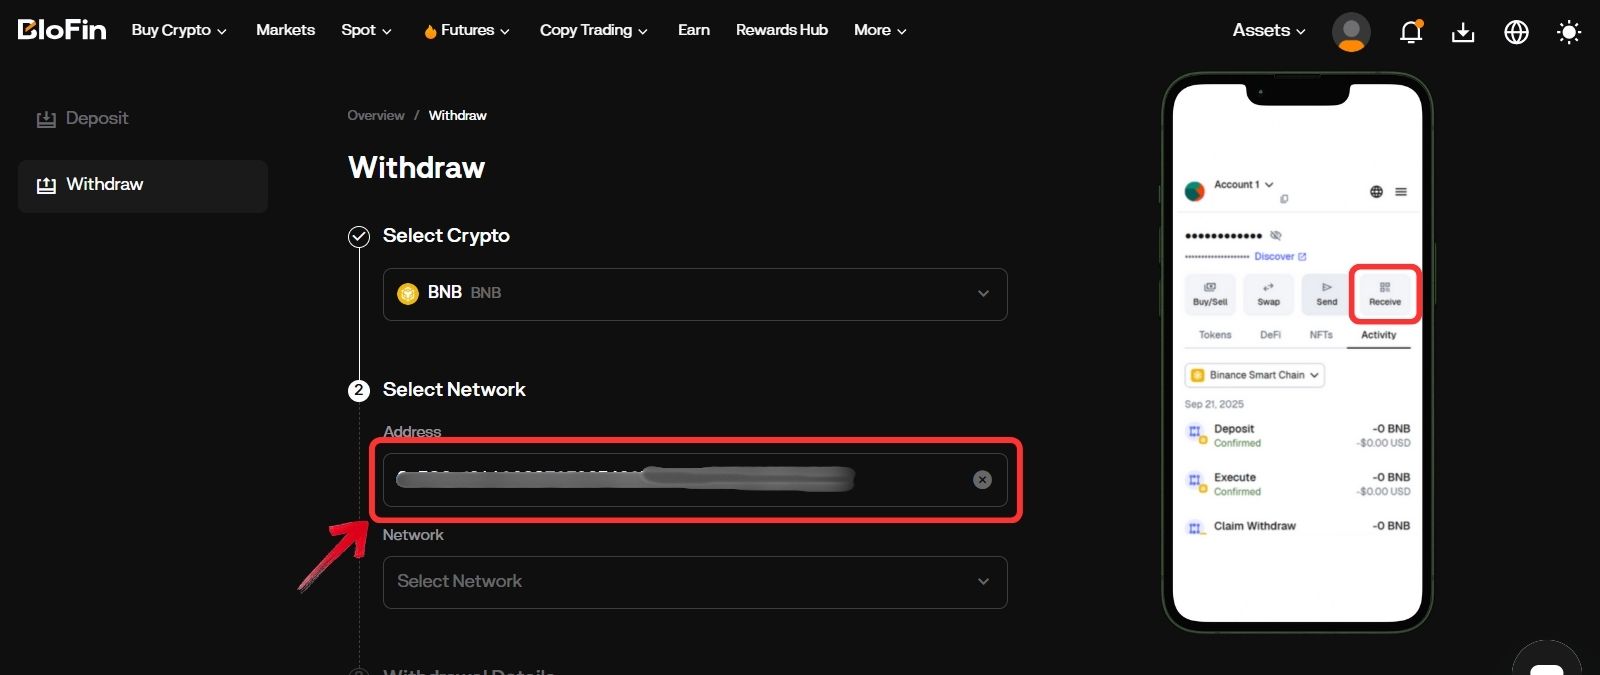
Step 4: In the “Address” field, paste your BNB Chain receiving address from MetaMask.
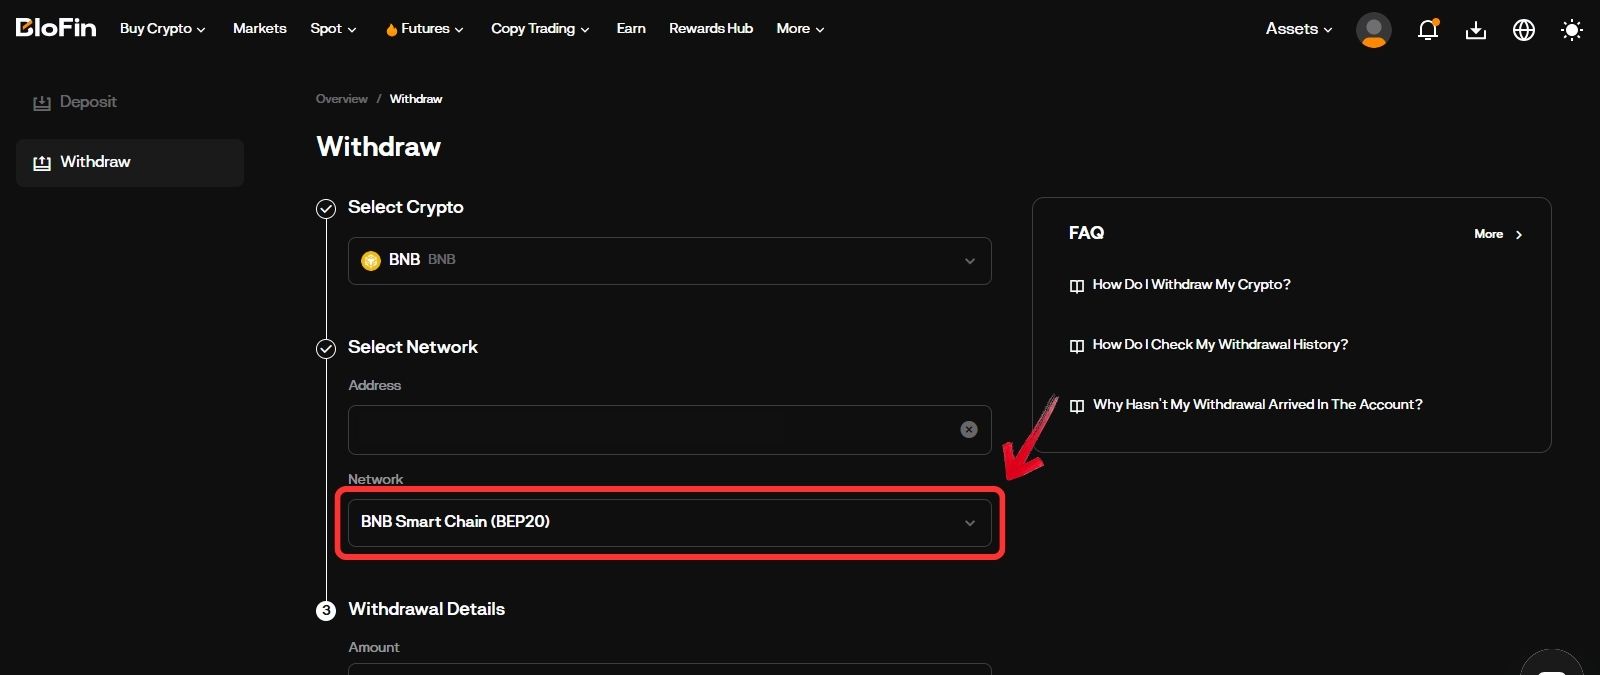
Step 5: In the “Network” field, select BNB Chain as the withdrawal network.
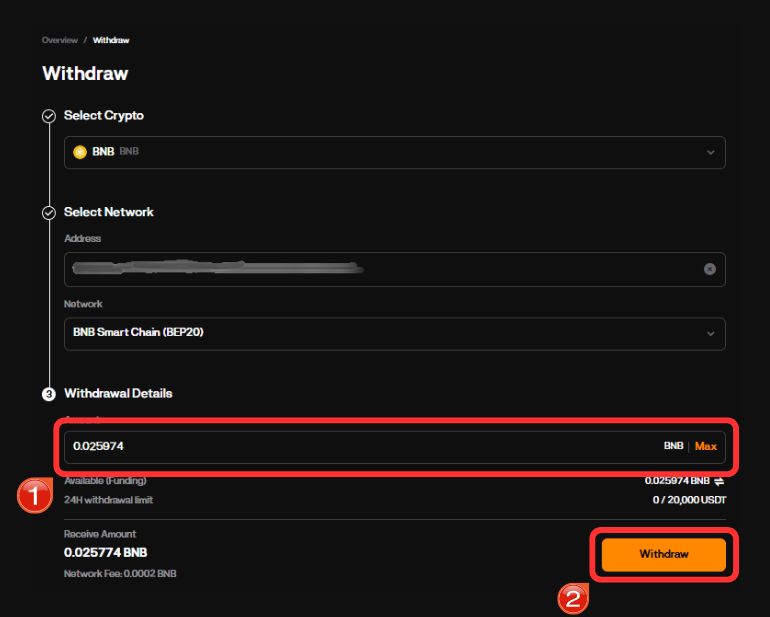
Step 6: Enter the amount of BNB you wish to withdraw to your MetaMask wallet and click “Withdraw”.
Swapping BNB for USDT in MetaMask
Once you have funds in your MetaMask wallet, there’s one more step, swapping some of your BNB for USDT. This might feel like an extra step, and you might wonder why we didn’t just buy and transfer USDT directly to MetaMask. The reason is simple: if we only transferred USDT, we wouldn’t have any BNB left in the wallet, and BNB is required to pay for gas fees on every on-chain transaction.
So, now that we have BNB ready, let’s quickly swap a portion of it for USDT so we have both, BNB for gas and USDT for trading on Aster DEX.
Step 1: Open your MetaMask extension and click on the “Swap” button.
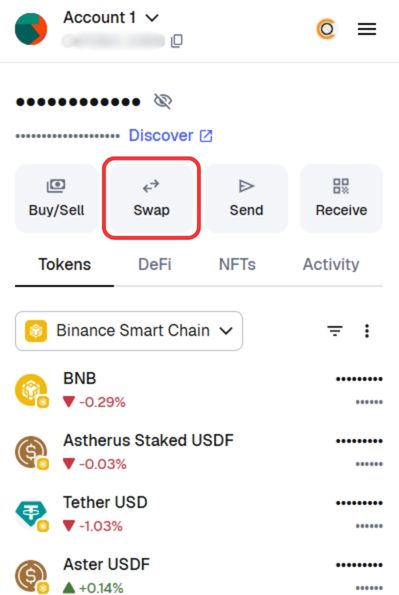
Step 2: Make sure BNB is selected in the “From” field and USDT is selected in the “To” field.
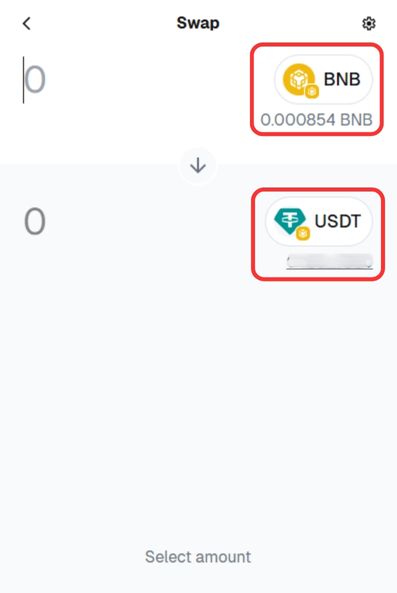
Step 3: Enter the amount of BNB you want to swap for USDT.
Step 4: Review the transaction details carefully, then click “Submit” to approve the swap.
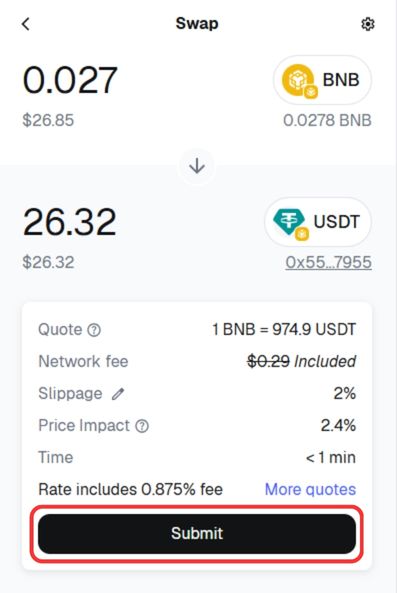
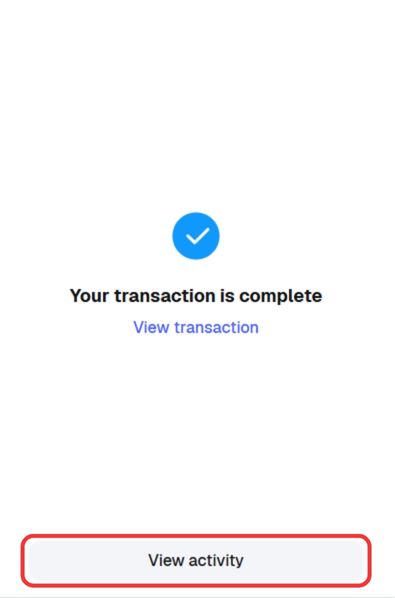
Step 5: Once the swap is successful, you’ll see a confirmation message. Click “View Activity” to return to your MetaMask dashboard and verify the updated balance.
How to Deposit on Aster DEX
Depositing on Aster is simple, but since it’s a decentralized transaction, you need to be careful with details like the correct receiving wallet address and network. Here’s how you can transfer your funds to Aster DEX:
Step 1: Open your browser and go to the official Aster DEX website.
Step 2: Once you’re on the platform, click the “Connect Wallet” button in the top-right corner and connect the wallet where your funds are stored.
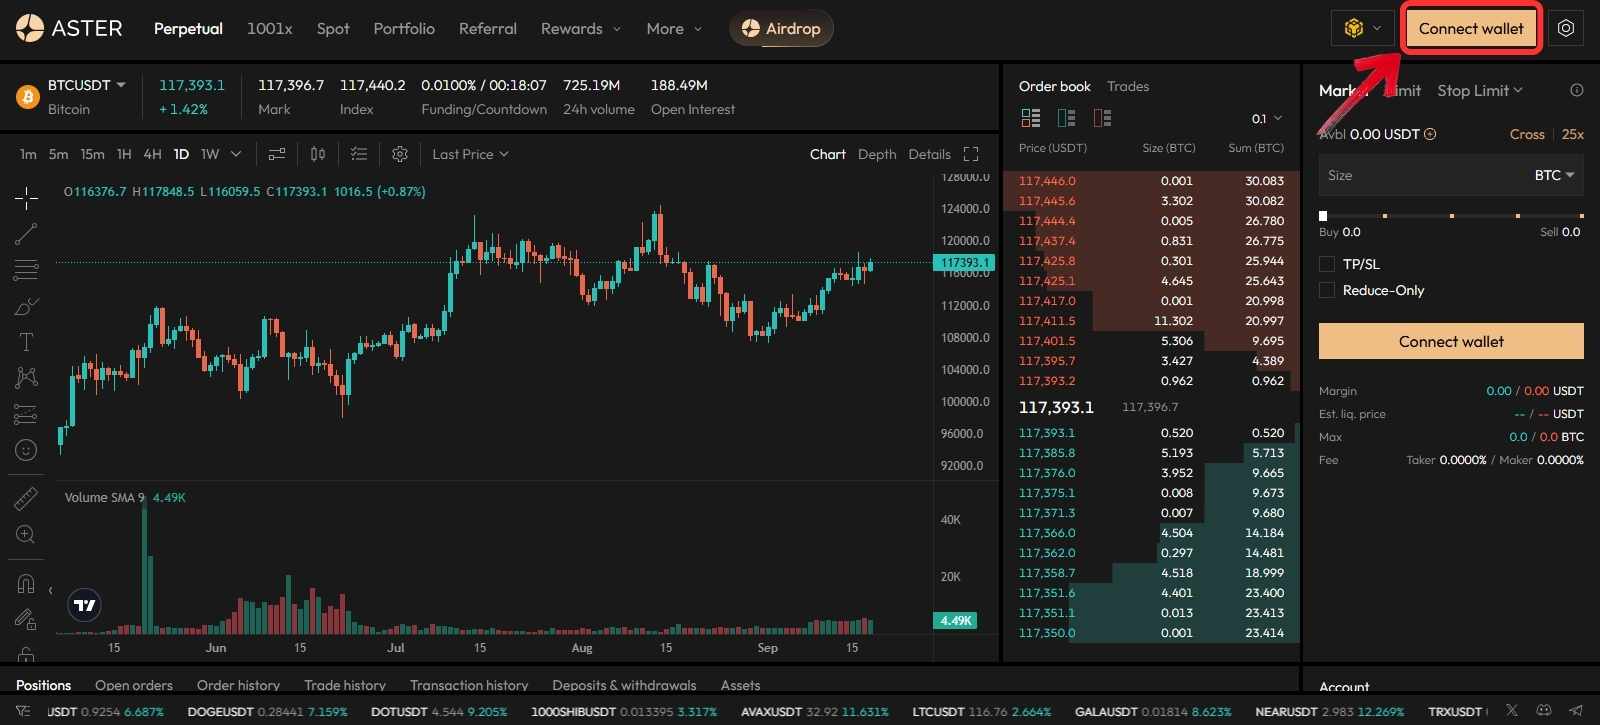
Step 3: Once your wallet is connected to Aster DEX, click on the “Deposit” button.
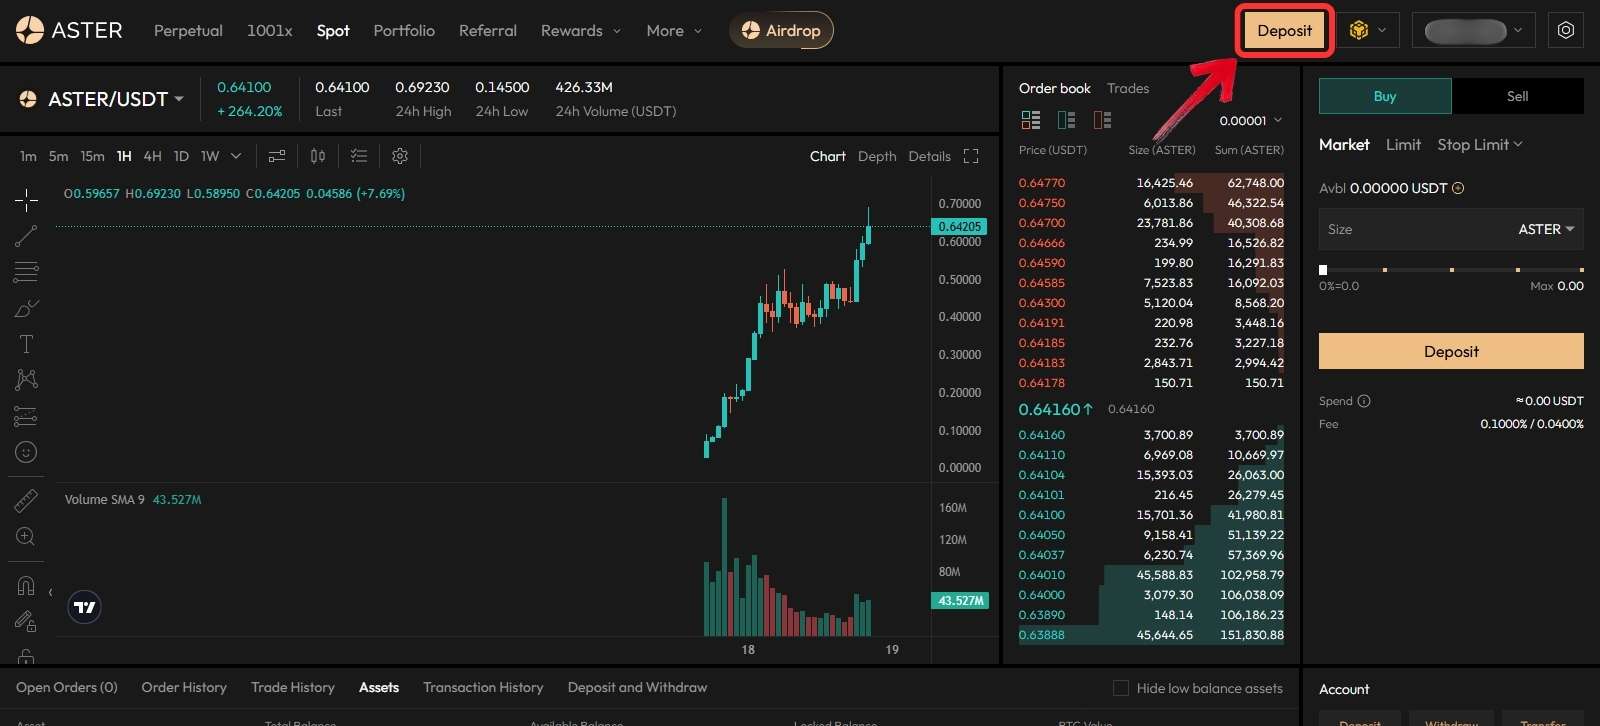
Step 4: Now select the Aster DEX account you wish to make your deposit; Perpetual or Spot.
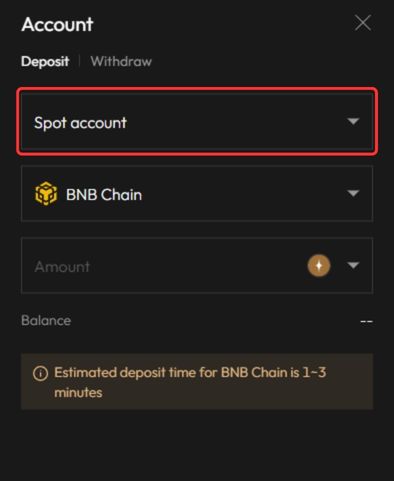
Step 5: Select the correct network and token. For example, if you hold USDT on the BNB Chain, choose BNB Chain as the network and USDT from the token dropdown.
Step 6: Enter the amount you wish to deposit and click “Deposit”.
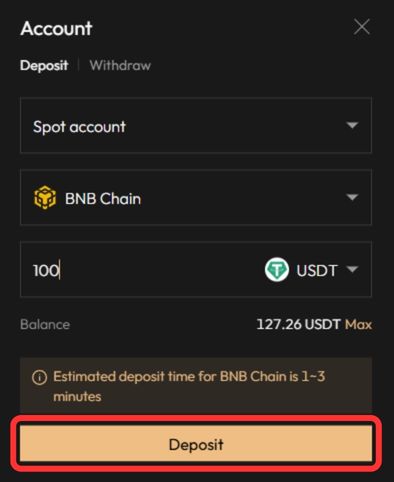
Once the transaction is approved, your funds will move from your Web3 wallet to Aster DEX and become available for trading. Aster DEX does not charge extra deposit fees, you’ll only pay the network fee, which can vary depending on the blockchain.
How to Withdraw Funds from Aster DEX
Withdrawing from Aster DEX is just as simple as depositing. Here’s how you can move your funds back to your wallet:
Step 1: On the Aster DEX platform, click the “Deposit” button in the top-right corner.
Step 2: A pop-up window will appear. Switch to the “Withdraw” tab.
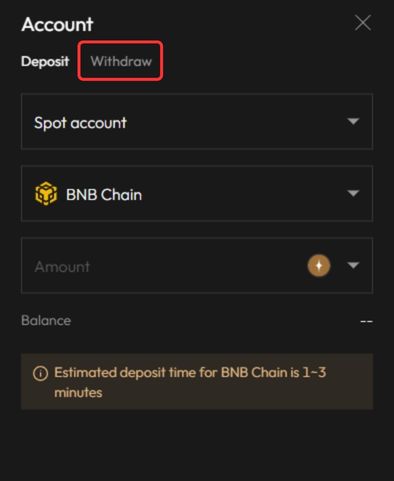
Step 3: Select the account where your funds are stored; Perpetual or Spot.
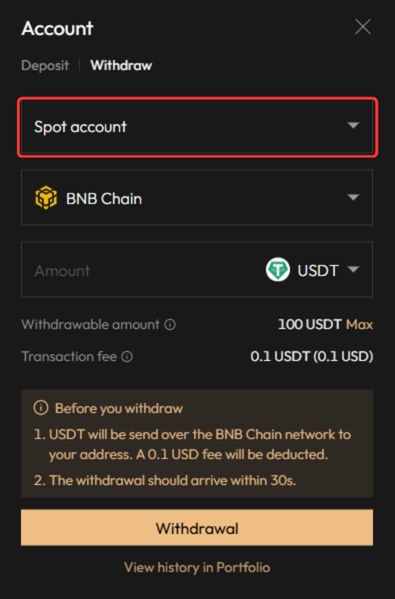
Step 4: Next, select the network where you want to transfer your funds and choose the token you want to withdraw.
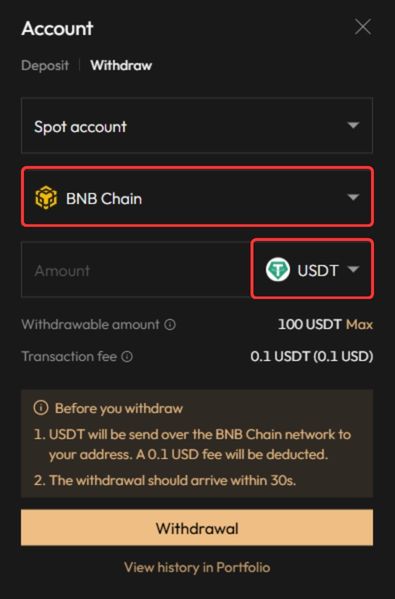
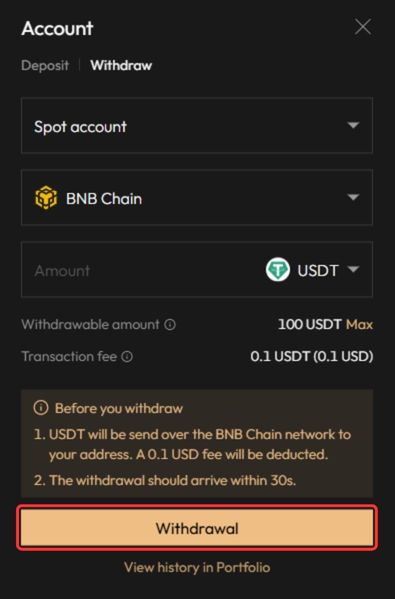
Step 5: Enter the amount you want to withdraw, then click the “Withdraw” button.
Transfer Funds Between Aster DEX Accounts: Spot to Perpetual
Just like on other exchanges, you need to transfer funds between Spot and Perpetual accounts depending on where you want to trade. The process on Aster DEX is simple and only takes a few clicks. Here’s how to move funds from Spot to Perpetual:
Step 1: On the Aster DEX Spot interface, scroll down to the Account section located just below the trading tools.
Step 2: Click the Transfer button to open the transfer window.
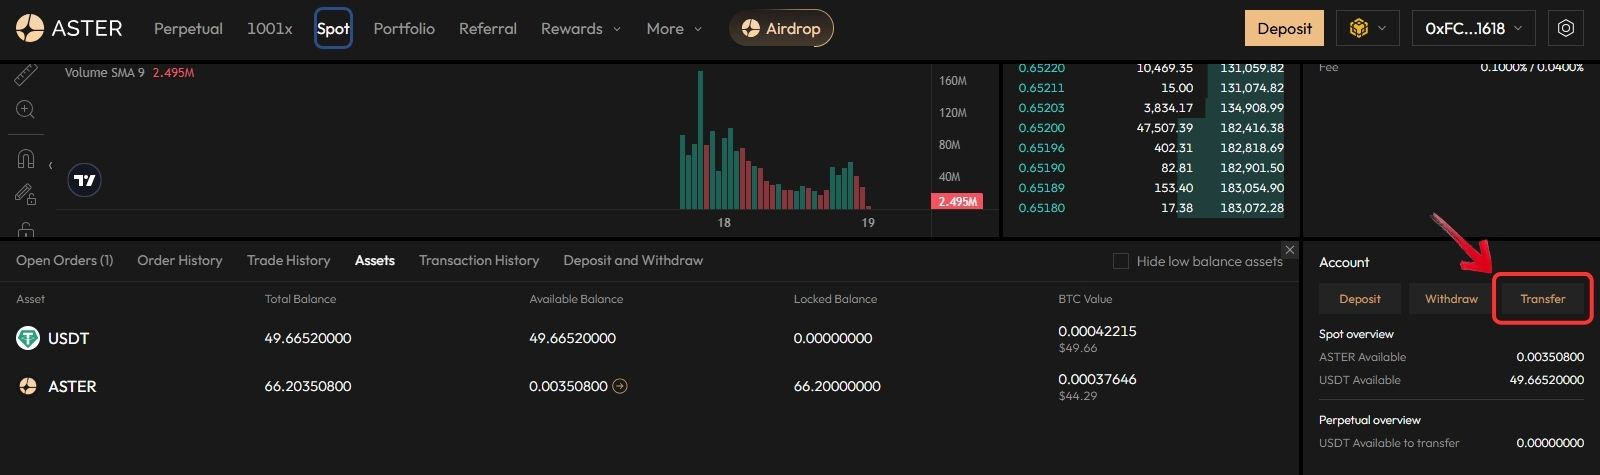
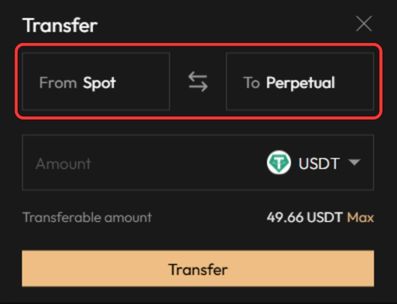
Step 3: Set the transfer direction, choose Spot → Perpetual if you want to trade futures, or Perpetual → Spot if you’re moving funds back.
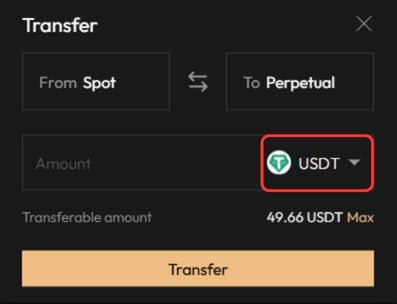
Step 4: Select the token you want to transfer between accounts.
Step 5: Enter the amount you wish to transfer, then click the “Transfer” button.
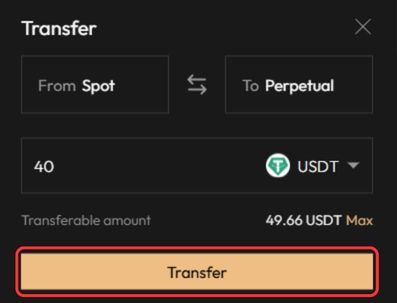
Your balance will update instantly, and no gas fees are charged for internal transfers.
What is Aster DEX?
Aster DEX is a next-generation decentralized perpetual exchange designed to make trading simple and powerful. It was formed after the 2024 merger of Astherus and APX Finance, combining Astherus’ yield-generating products with APX’s advanced perpetual trading infrastructure.
The platform focuses on multi-chain perpetual contracts, supporting deep on-chain liquidity, one-click trading, and advanced tools for professional traders. Aster offers two trading modes: Pro Mode with a full order book interface and low fees, and 1001x, an on-chain, MEV-resistant, one-click perpetuals system.
ASTER Token
Aster
Connessione in corso- Capitalizzazione di mercato
- $1,94B Posizione n. 54
- Volume di trading nelle 24 ore
- $69,79M Su tutti i mercati monitorati
- Offerta circolante
- 2,71B ASTER 34,8% dell’offerta totale
Bottom Line
Aster DEX is growing fast and attracting serious attention in the DeFi space, making it an interesting platform for traders looking for a decentralized alternative. Deposits and withdrawals are quick, with no extra fees on deposits and a small flat fee on withdrawals. Just make sure you have an EVM-compatible wallet like MetaMask, some funds ready, and always double-check the network and wallet address before confirming. As with any DeFi platform, stay alert to phishing risks and only use official links. With these basics in place, you’re ready to start trading confidently on Aster DEX.
FAQs
No. Aster DEX does not charge any additional fees for deposits. You only pay the network gas fee required by the blockchain.
Withdrawals are very fast, typically completed within 30 seconds, depending on network congestion.
Deposits usually take 1–3 minutes after the transaction is confirmed on-chain.
Aster DEX currently supports Ethereum, BNB Chain, Solana, and Arbitrum networks.