Summary
Hyperliquid Account Setup
Before we dive into trading on Hyperliquid, the first step is to set up an account. If you’re new to decentralized trading or blockchain technology, the process might seem daunting, but it’s actually straightforward. To set up and fund your account easily, here’s what you’ll need:
- A Web3 Wallet:
Web3 wallets like MetaMask allow you to store, transfer, and interact with networks without requiring KYC. Transactions are entirely on-chain, aligning with the principles of decentralization. Setting up a Web3 wallet is simple, but managing it requires caution. Since it’s decentralized, you’re responsible for storing the wallet’s private keys—losing them means losing access to your wallet permanently. For Hyperliquid, ensure your wallet supports the Arbitrum network, such as MetaMask, Trust Wallet, or Coinbase Wallet.
- A Centralized Exchange:
While Hyperliquid is decentralized, centralized exchanges like BloFin are helpful for funding your wallet. You can purchase $ETH on BloFin and transfer it to your Web3 wallet using the Arbitrum network. When choosing an exchange, ensure it supports Arbitrum for seamless on-chain transfers.
With these two tools ready, you’re set to begin your trading journey on Hyperliquid. If you need further assistance, refer to our detailed guide on creating and setting up your Hyperliquid account step-by-step.
How to Trade on Hyperliquid
Before you begin trading on Hyperliquid, you will need to fund your Hyperliquid wallet. If you haven’t completed this step or are facing any issues, you can refer to our Getting Started with Hyperliquid guide. Once your wallet is funded, you can trade on both spot and perpetual contracts on Hyperliquid. Let’s take a closer look at each of them separately so you can start trading on Hyperliquid with confidence.
Spot Trading
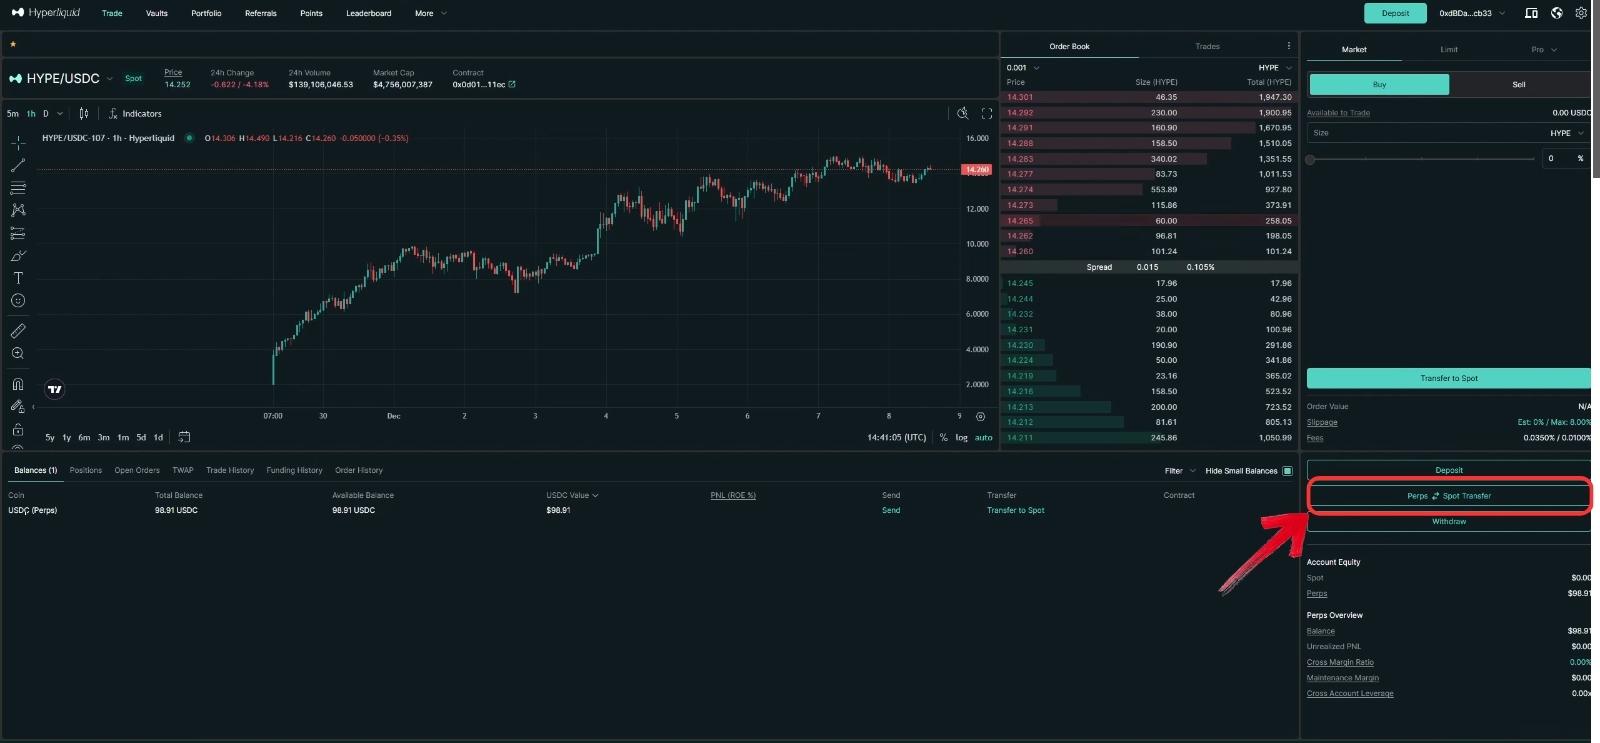
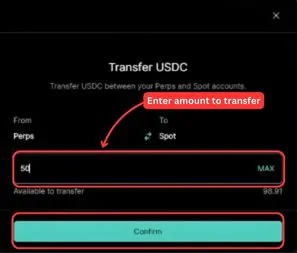
Step 1: Once your funds are available on Hyperliquid, you may want to transfer some USDC to your Hyperliquid spot wallet. Click on the “Perps to Spot Transfer” option.
Step 2: The Transfer window will open. Make sure the fund flow is set from “Perps” to “Spot”.
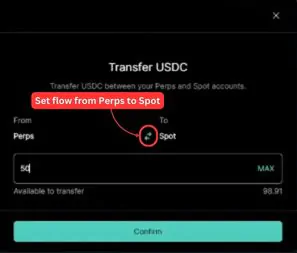
Step 3: Next, enter the amount you wish to transfer and click on the “Confirm” button.
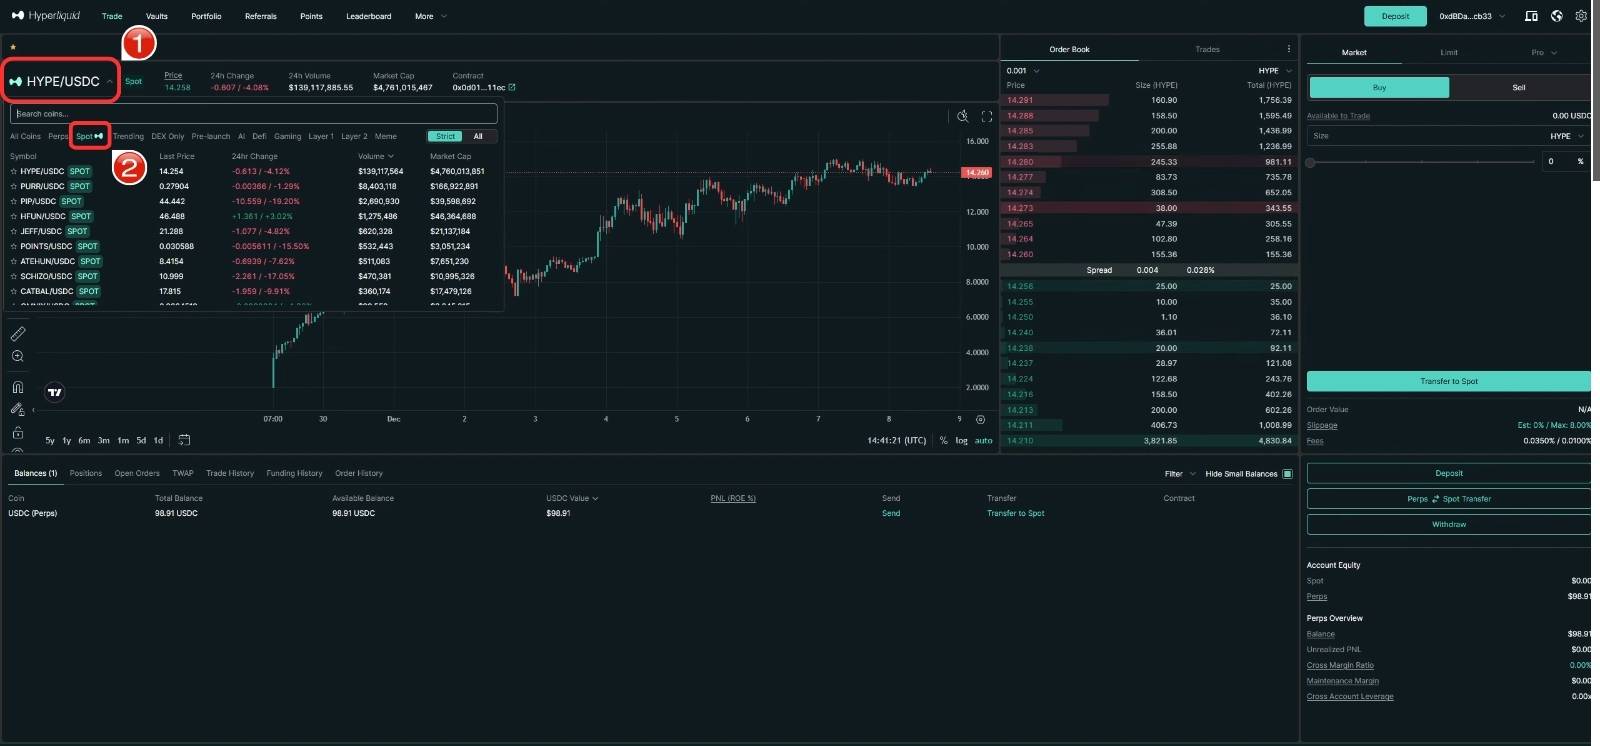
Step 4: Once the funds have been transferred, click on the coin dropdown menu located at the top left, and head over to the “Spot” tab to view all the cryptocurrencies available for spot trading.
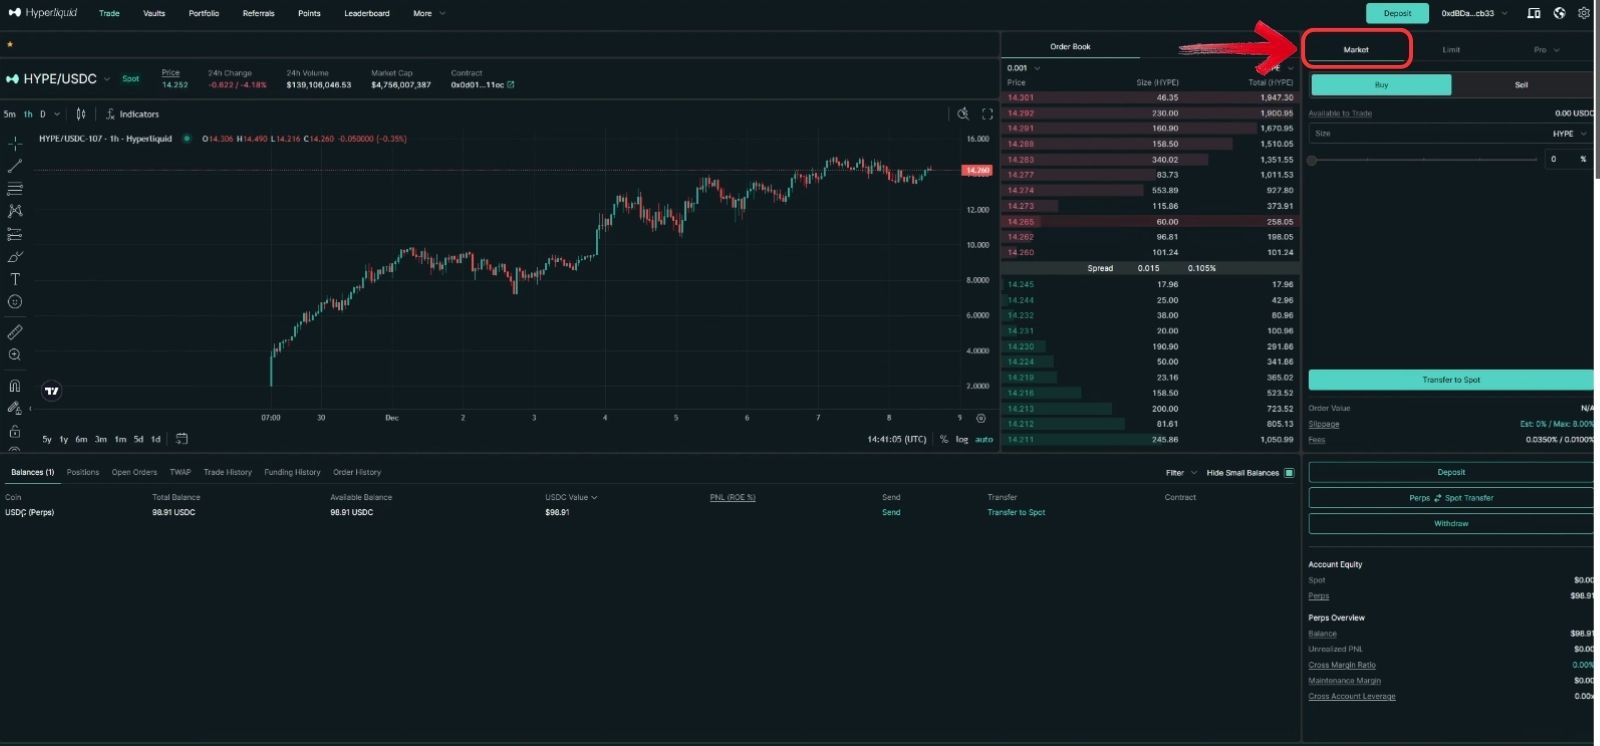
Step 5: After selecting the coin, you’ll find the trading options on the right pane, where you can either buy or sell.
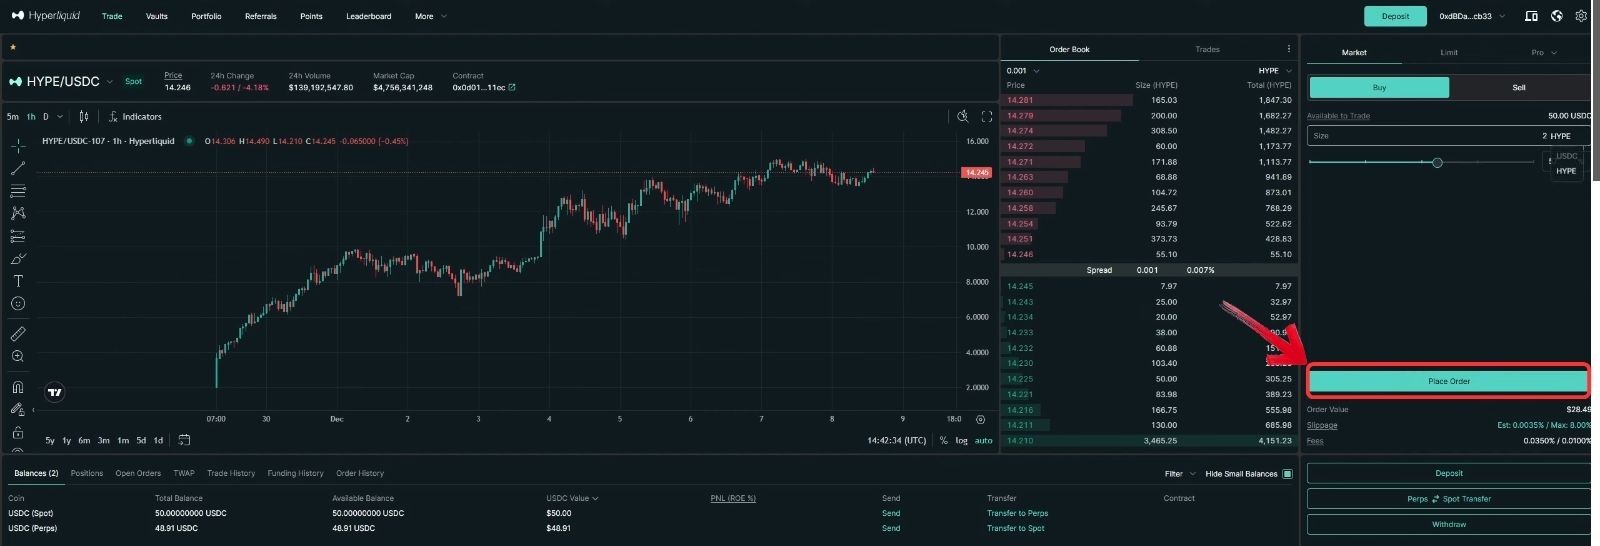
Step 6: If you wish to open a Market order, click on the “Market” tab.
Step 7: Use the toggle to set the amount you wish to trade.

Step 8: For added convenience, you can set your order based on the selected token or USDC.
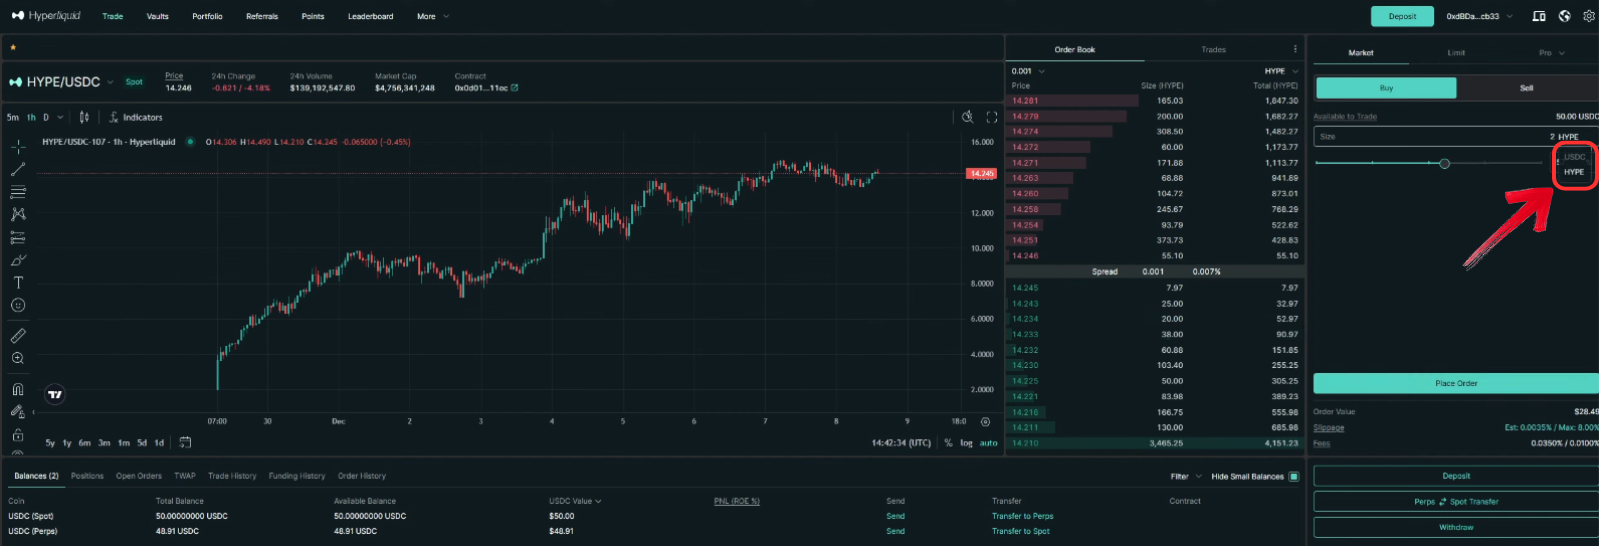
Step 9: Once your order is set up, click on the “Place Order” button to confirm the trade.
Step 10: A confirmation window will pop up. If you wish to avoid seeing this confirmation for every trade, simply click the checkbox and then click “Buy” to place your order.
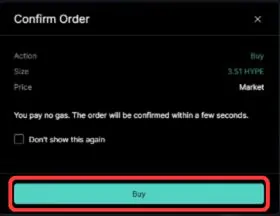
That’s it! You can easily buy cryptocurrencies on Hyperliquid. The steps for selling are also similar—just click on the “Sell” tab and set your order.
Apart from Market orders, you can also place Limit orders or specialized orders, such as TWAP orders, for your Hyperliquid spot trading.
Perpetual Trading
The perpetual trading platform on Hyperliquid is very similar to the spot trading experience but comes with additional tools to set limits and trading modes. Let’s take a closer look at how you can use Hyperliquid’s trading tools to trade perpetual contracts.
Open Orders
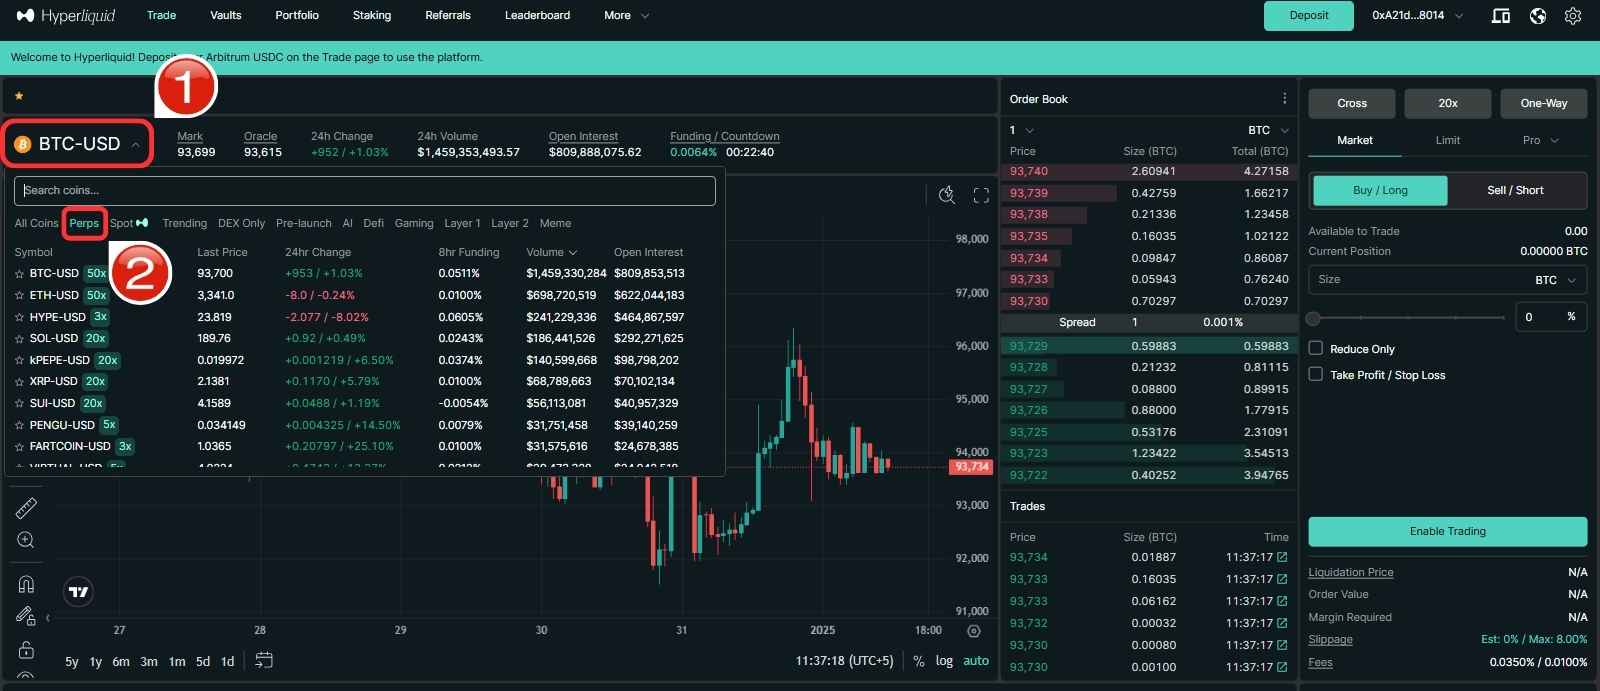
Step 1: First, select the perpetual contract by clicking on the Coin dropdown menu, and then click on “Perps”. Here, you can choose from over 149+ perpetual contracts available.
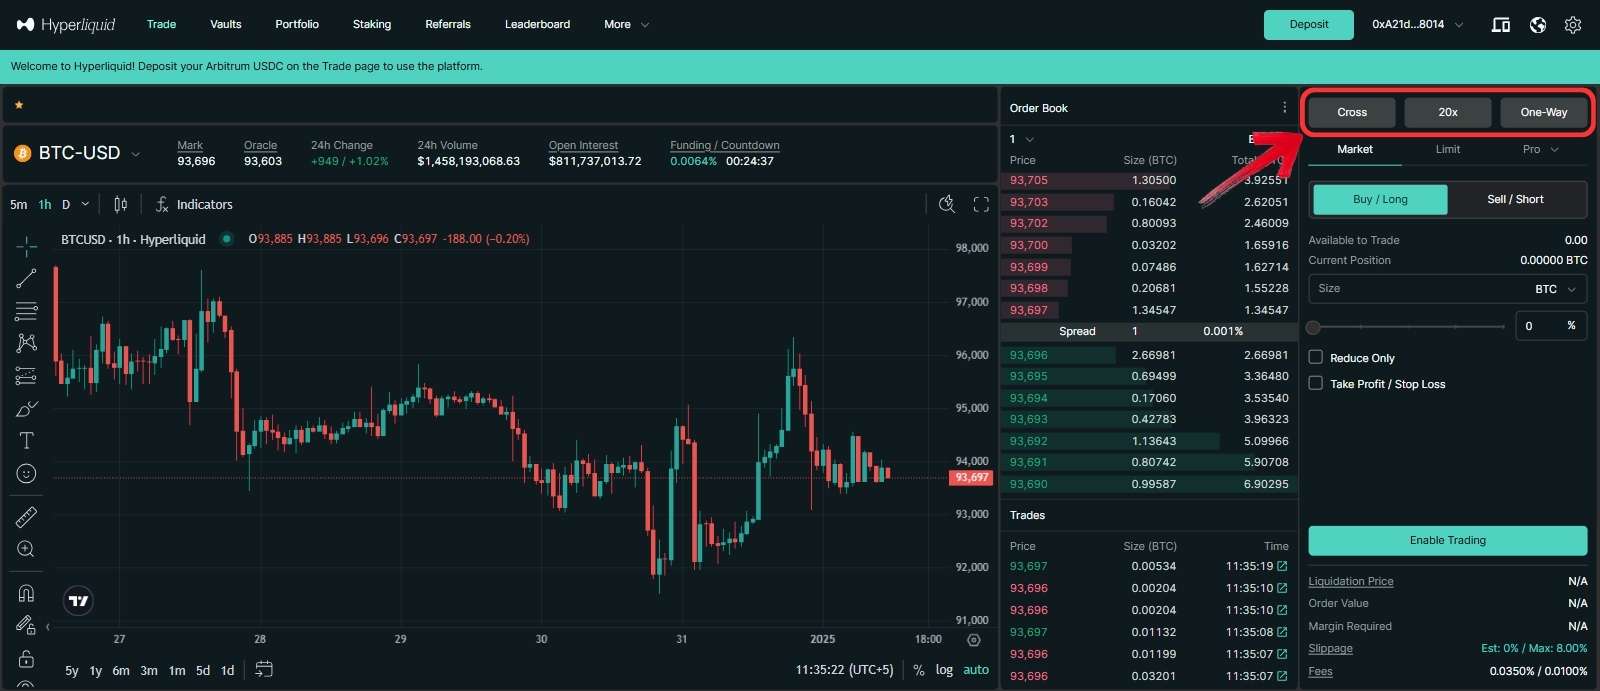
Step 2: Once you’ve selected the contract, head over to the trading tools on the right pane. Here, you can set the initial settings, such as Position Mode and Leverage. Adjust these settings according to your risk appetite.
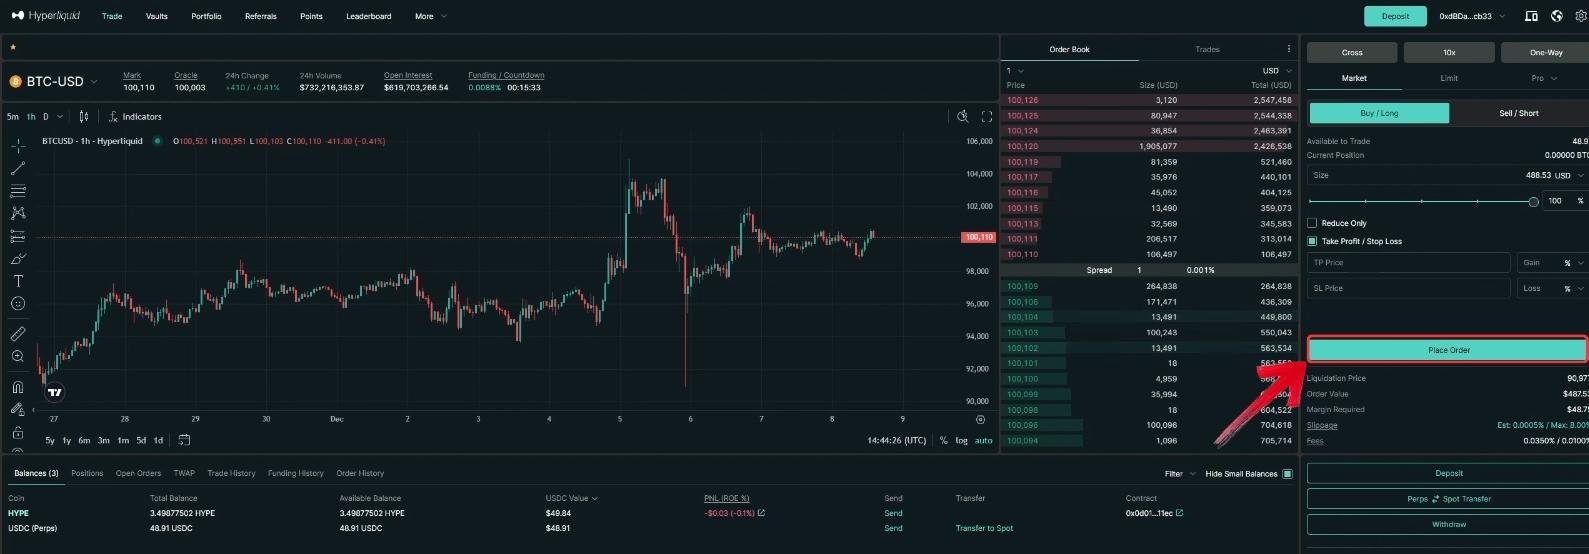
Step 3: Now let’s open a position. In this example, we will open a long position on BTC. Click on “Market” and then select “Buy/Long”.
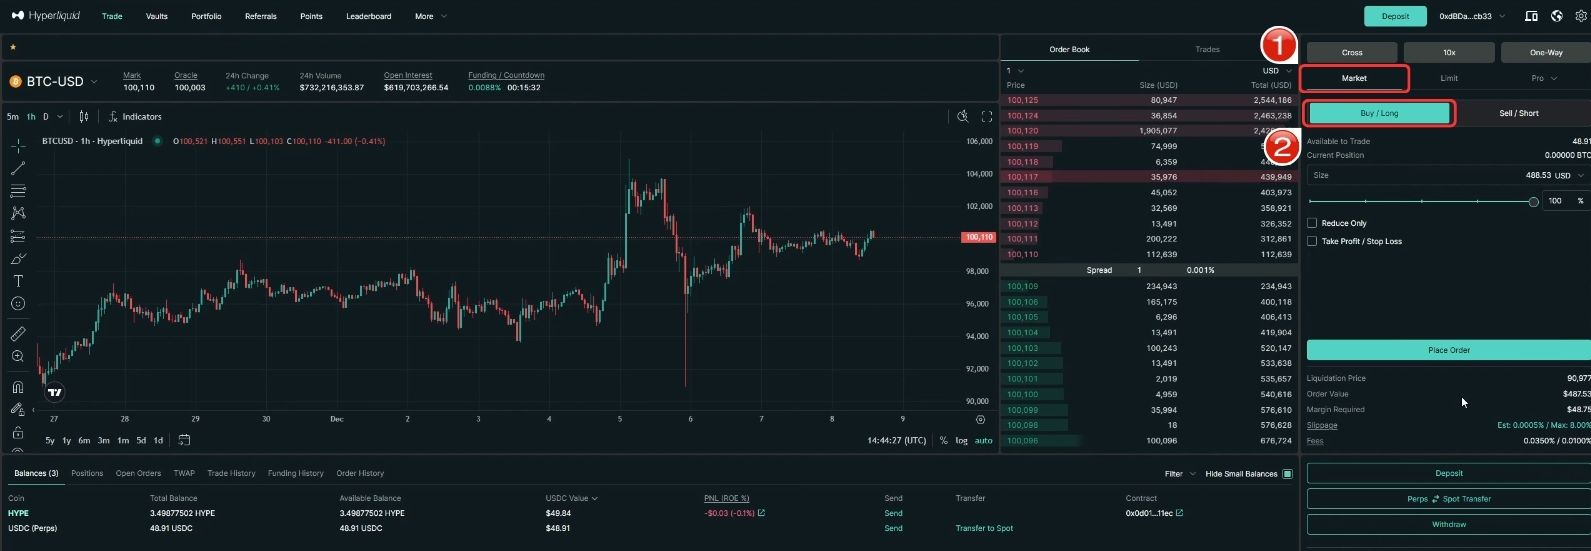
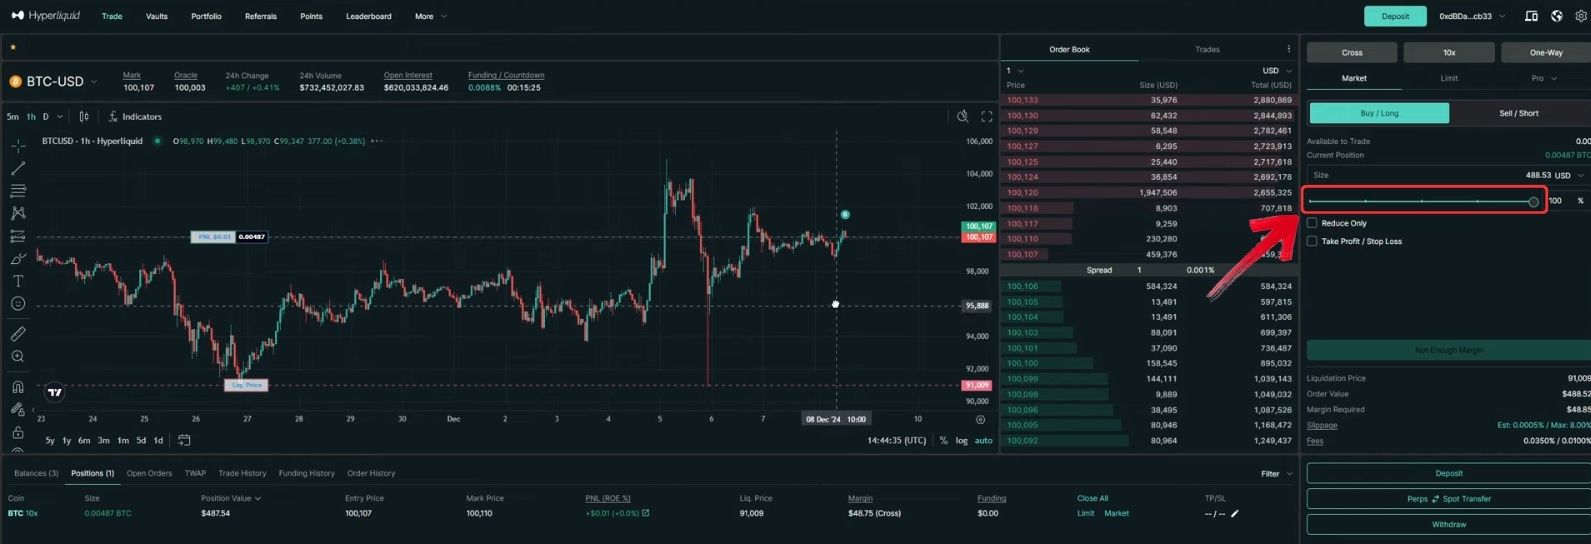
Step 4: Use the toggle to set your position size, or simply enter the amount for which you want to open the trade.
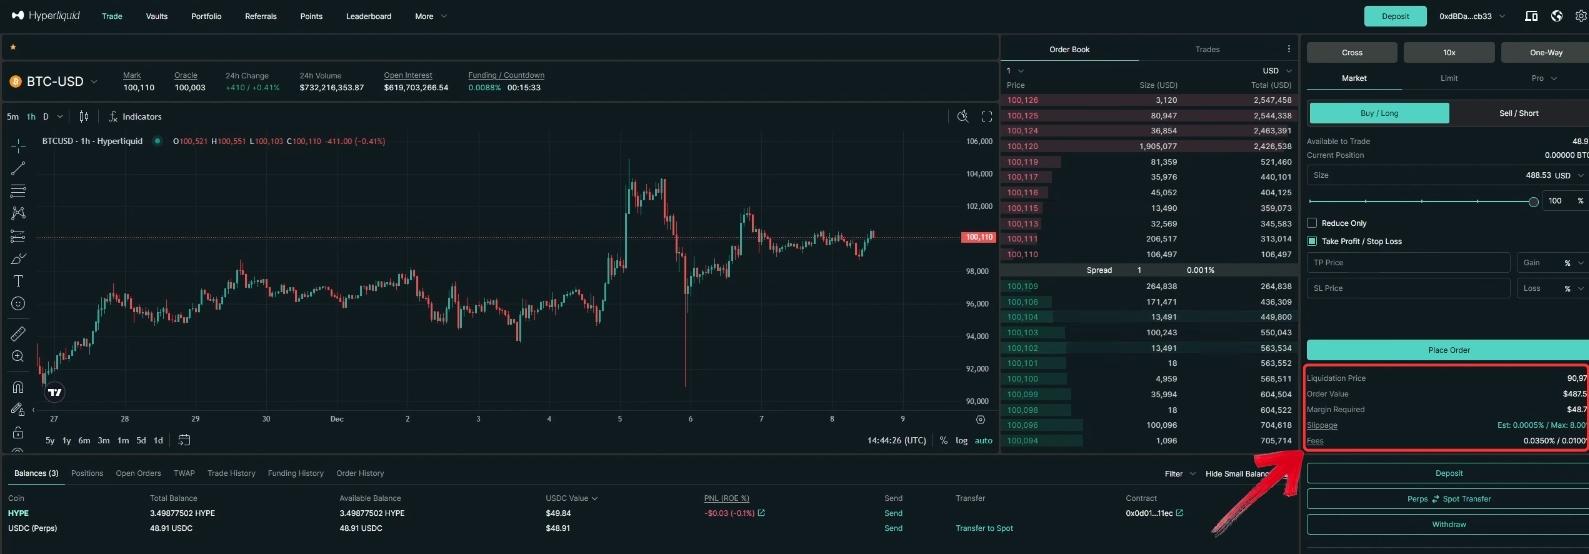
Step 5: Below the trading tools, you can review your trade setup, including parameters like Liquidation Price, Order Value, and Fees.
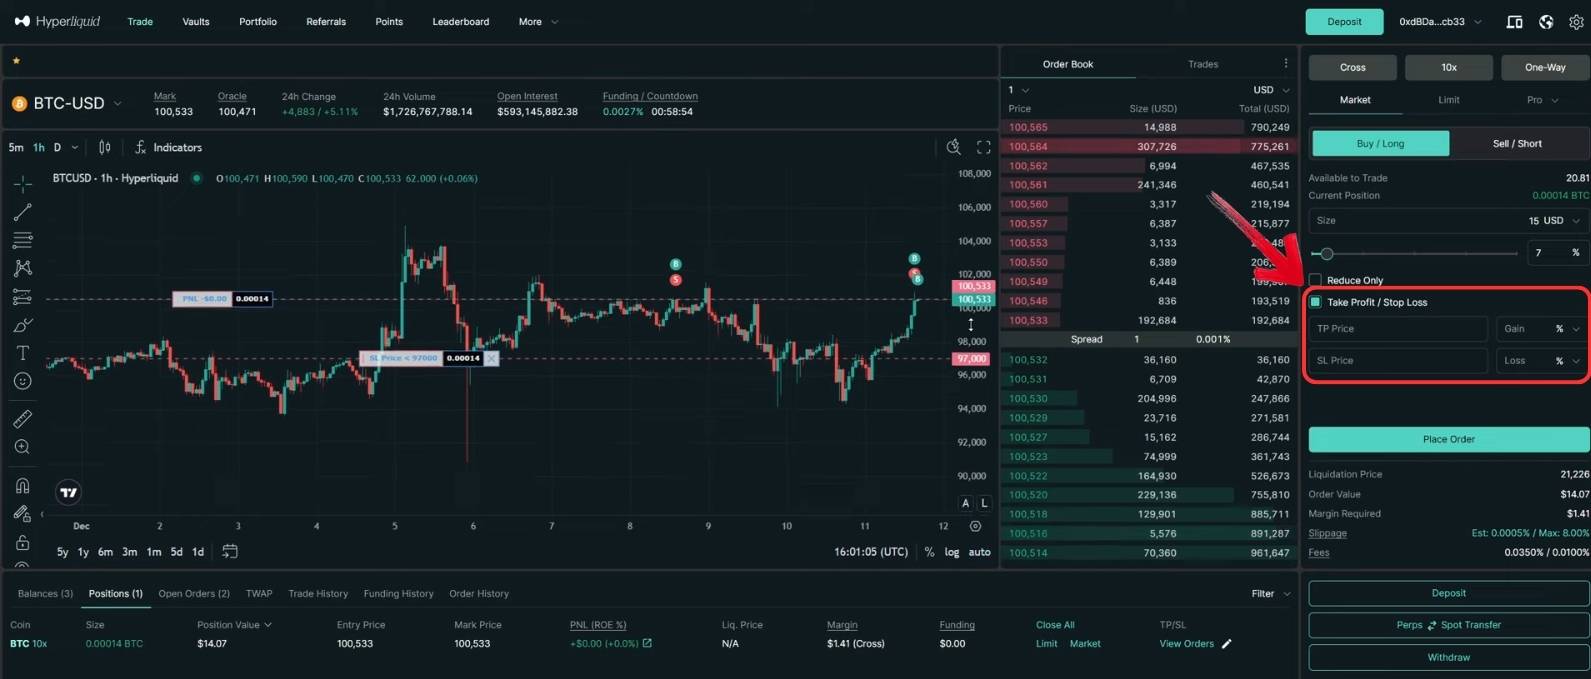
Step 6: Additionally, click on the “Take Profit / Stop Loss” checkbox to set the maximum and minimum values at which you want to close your position, either at a profit or a loss.
Step 7: Once your position is ready, click on the “Place Order” button to open a long position.
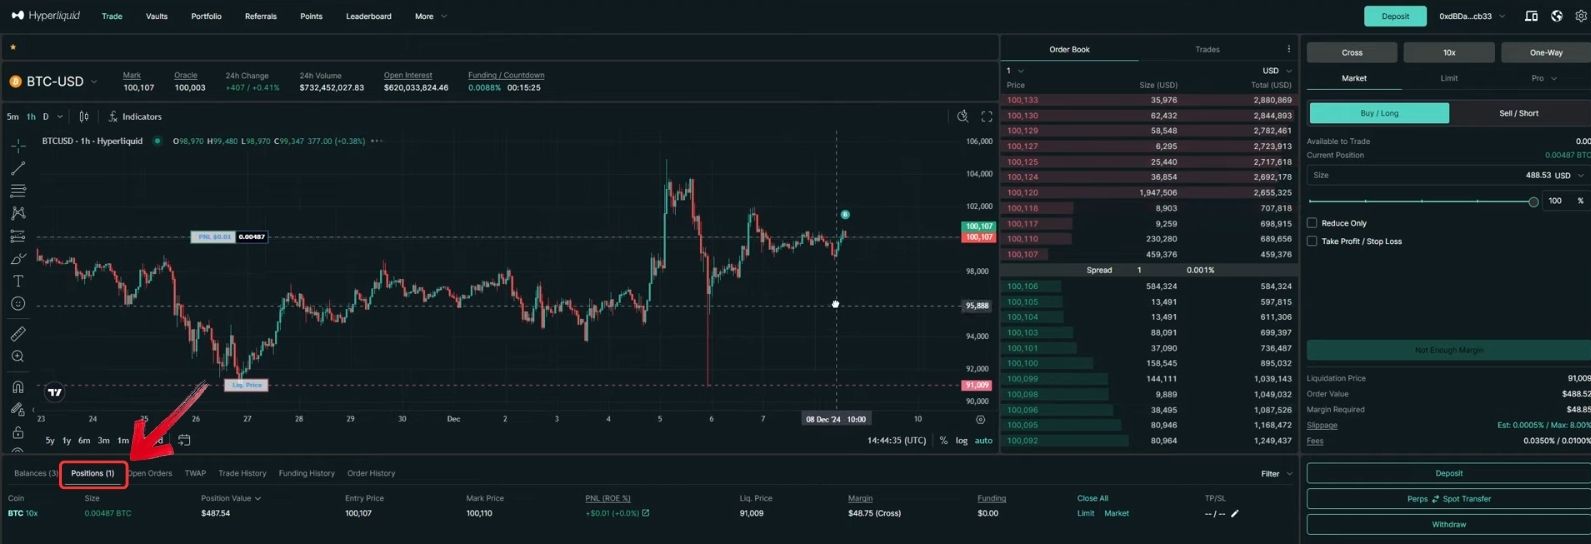
Step 8: You can view all your open positions in the “Position” tab located right below the trading charts.
On Hyperliquid, you can also set limit orders and use other advanced order types, such as TWAP, Scale, Stop Limit, and Stop Market orders. However, for beginners, starting with a Market or Limit order at low leverage in Isolated Mode is a good option.
Set Take Profit/ Stop Loss
You can set Take Profit (TP) and Stop Loss (SL) levels initially while taking a trade. However, if you want to modify the trade setup of an ongoing position, here’s what you need to do:
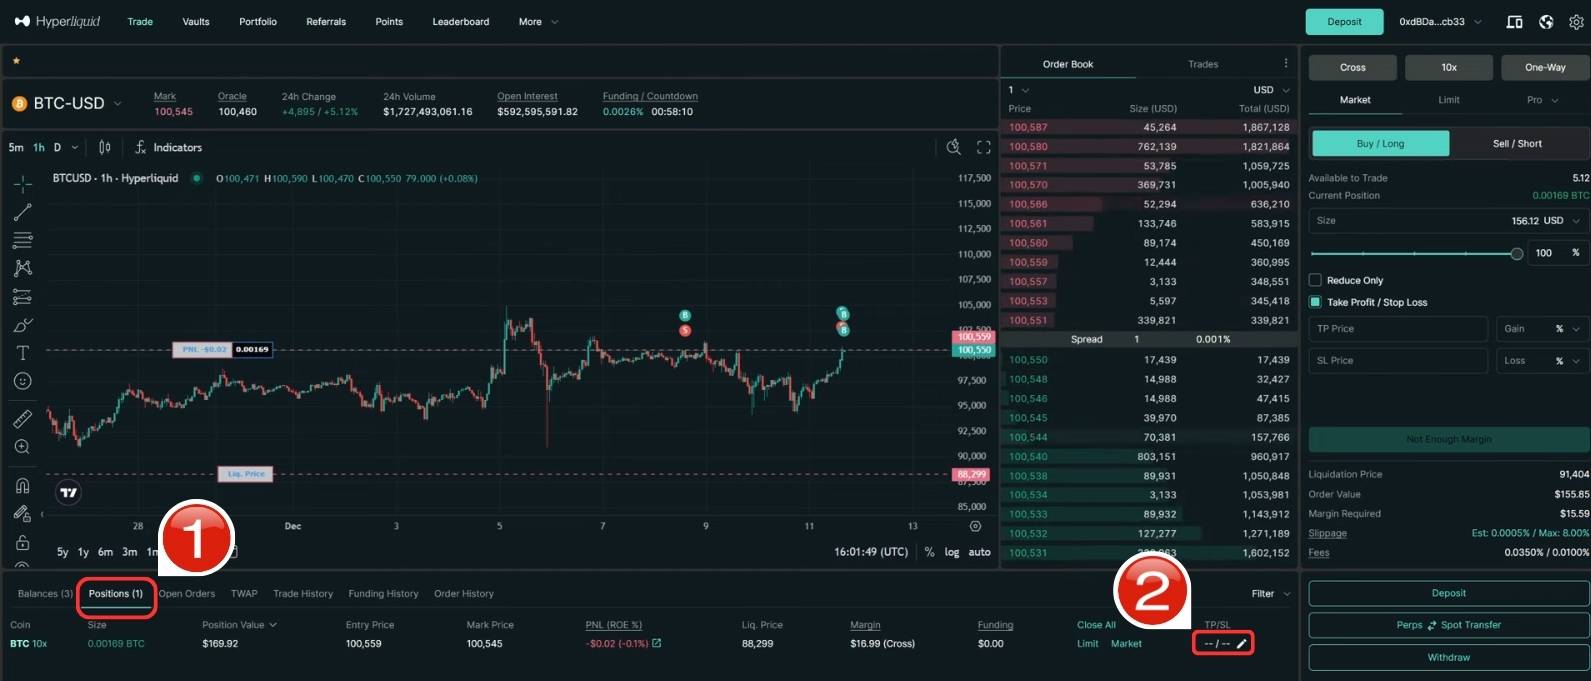
Step 1: All your open positions can be found in the Positions tab. Click on the “Positions” tab.
Step 2: In the Positions tab, click on the “Pencil” icon located in the TP/SL column.
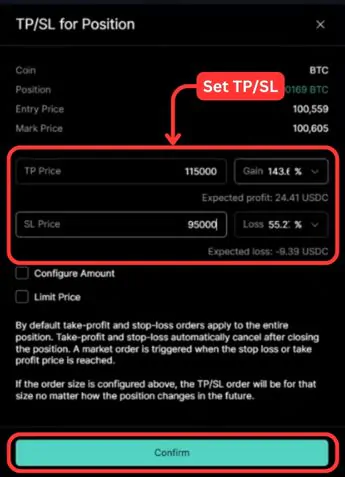
Step 3: This will open the “TP/SL for Position” pop-up window. Simply add a new TP and SL for the trade and then click on “Confirm”.
Step 4: To view all your open orders, you can either check the chart, where all your TP/SL levels will be displayed, or head over to the “Orders” tab. Here, you will find all the open orders.
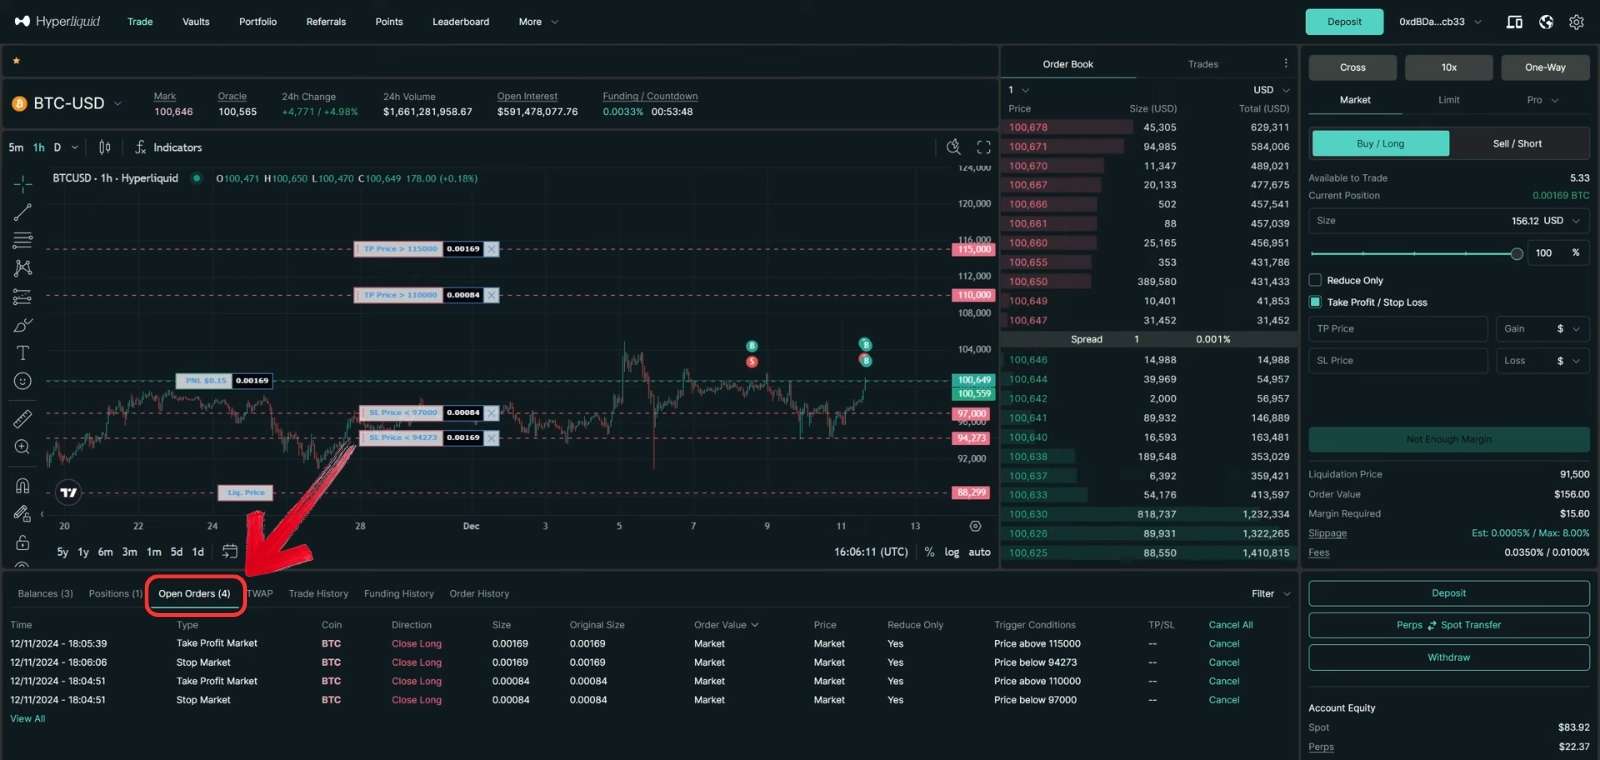
Hyperliquid allows you to set multiple Take Profit (TP) and Stop Loss (SL) levels, with all your TP and SL setups displayed directly on the trading charts. Additionally, besides using the Positions tab, you can also directly modify TPs and SLs on the chart itself.
For a detailed walkthrough, watch our complete perpetual trading video to learn how to set Take Profits and Stop Losses on Hyperliquid with step-by-step examples.
Close Trades
Closing trades on Hyperliquid is fairly simple. Here’s what you need to do:
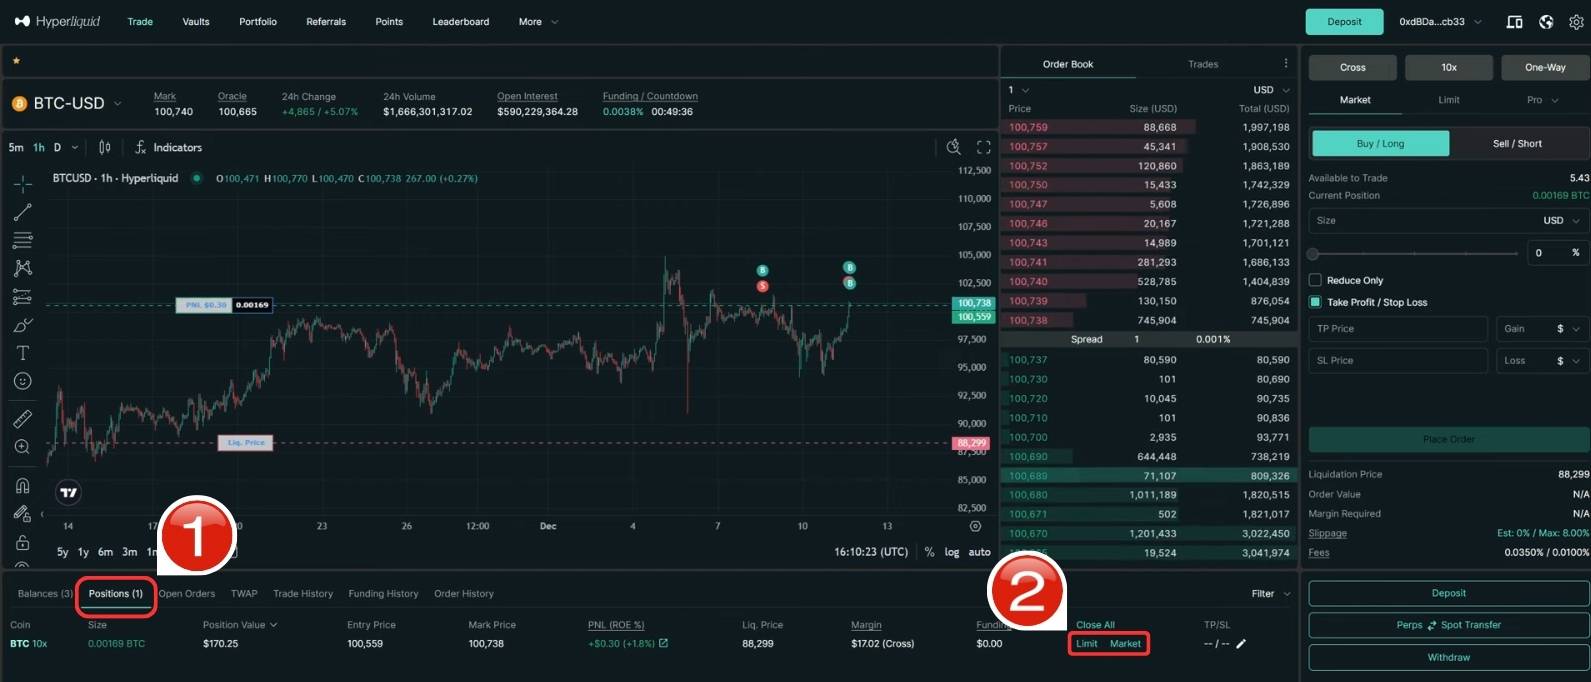
Step 1: Go to the “Positions” tab located right below the trading charts.
Step 2: In the “Close All” column, you will find two options for each open position: Limit and Market.
- If you want to close your position at the market price, simply click on “Market”.
- Alternatively, click on “Limit” and enter your desired price to close the position.
Hyperliquid Trading Fees
Hyperliquid currently charges 0.01% maker fees and 0.035% taker fees on both spot and perpetual contracts.
While there is generally 0% slippage, a maximum slippage of 8% is set for market orders placed from the order form to avoid transaction failures. Similarly, for Take Profit (TP) and Stop Loss (SL) orders, the maximum slippage is set to 10% for the same reason.
In addition to trading fees, you may encounter network fees when depositing funds to Hyperliquid L1, which are minimal. Withdrawals have a fixed fee of $1 for all transactions.
About Hyperliquid
Hyperliquid is a decentralized trading platform built on its own Layer 1 blockchain, enabling on-chain trades with zero slippage. It combines the efficiency of centralized exchanges with the transparency of decentralized platforms. With both spot and perpetual trading available, Hyperliquid supports 11+ cryptocurrencies on spot and 149+ perpetual contracts with up to 50x leverage.
Bottomline
Hyperliquid provides futures and spot trading, blending the convenience of centralized exchanges with the transparency of blockchain technology. With intuitive tools for setting up trades and managing Take Profit and Stop Loss levels, the platform is straightforward to use. It’s designed to simplify the trading experience for those seeking decentralized solutions.
FAQs
1. Can I use Hyperliquid without a Web3 wallet?
No, a Web3 wallet like MetaMask or Trust Wallet is essential for accessing and trading on Hyperliquid. These wallets allow you to store funds, interact with the platform, and trade seamlessly without KYC.
2. What happens if I forget to set a Stop Loss or Take Profit?
If you don’t set a Stop Loss (SL) or Take Profit (TP), your trade will remain open until you manually close it or the position is liquidated (if trading with leverage). Setting SL/TP is crucial for managing risk and locking in profits.
3. Are there any unique order types available on Hyperliquid?
Yes, Hyperliquid supports advanced order types such as TWAP (Time-Weighted Average Price), Scale Orders, Stop Limit, and Stop Market orders. These tools allow for more sophisticated trading strategies compared to basic market or limit orders.
4. Does Hyperliquid require KYC for trading?
No, Hyperliquid is fully decentralized and does not require KYC. However, ensure you securely manage your Web3 wallet, as losing access to your private keys will result in a permanent loss of funds.

