Staking is a valuable benefit for any crypto holder, offering incentives for holding assets. With staking now live on Hyperliquid, $HYPE token holders have the exciting opportunity to stake their tokens, secure the network, and earn rewards. In this guide, we’ll cover all the key information you need to know before you begin staking on Hyperliquid.
You can read our full in-depth guide on this page or alternatively watch our step-by-step YouTube tutorial for Hyperliquid staking:
Hyperliquid Staking
With the official “Staking is now live on mainnet” announcement from Hyperliquid on X, the platform saw 300 million tokens ($8.4 billion) staked, with another 7 million tokens added by users within the first hour of staking going live. This offers $HYPE token holders the opportunity to earn rewards while collectively securing the network.
Amid recent security concerns, where experts labeled Hyperliquid vulnerable to attacks due to its largely centralized infrastructure relying on just four validators, the launch of staking aims to bolster security. The feature now operates with 16 validators, enhancing the platform’s decentralization and defense.
Hyperliquid
New TokenToken Symbol
HYPE
All-Time High
-
Current Price
Loading...
Market Cap
Loading...
Total Supply
Loading...
How Does Staking Work on Hyperliquid?
Staking on Hyperliquid allows holders to delegate their tokens to validators. Each validator is required to maintain a self-delegation of at least 10,000 $HYPE, and commissions are capped with a maximum increase of 1%. For those who prefer a longer-term commitment, Hyperliquid also supports locked token staking, where rewards remain locked initially.
The staking reward rate on Hyperliquid is determined by a formula where rewards inversely correlate to the square root of the total $HYPE staked. This results in an annual reward rate of approximately 2.37% when 400 million tokens are staked. To further encourage participation, the Hyper Foundation plans to introduce a Delegation Program, which will incentivize high-performing validators and foster a more vibrant staking ecosystem.
How to Stake on Hyperliquid
Being fairly new and a decentralized platform, staking on Hyperliquid can be a little confusing. Since real funds are involved, making mistakes is out of the question. Fortunately, this guide will take you from the very beginning to staking your $HYPE tokens on Hyperliquid, step by step. Here’s a quick memo of what you will need:
- EVM Wallet (e.g. MetaMask)
- Funds
Once you have these two in place, all you need to do is set up your funds on Hyperliquid. If you’re just starting out, feel free to read our guide on getting started with Hyperliquid to set up your account from scratch.
Step 1: Enable Trading on Hyperliquid
To start trading on Hyperliquid, the first step is to connect your wallet and enable trading on the platform.
1. Open your browser and head over to the Hyperliquid platform.
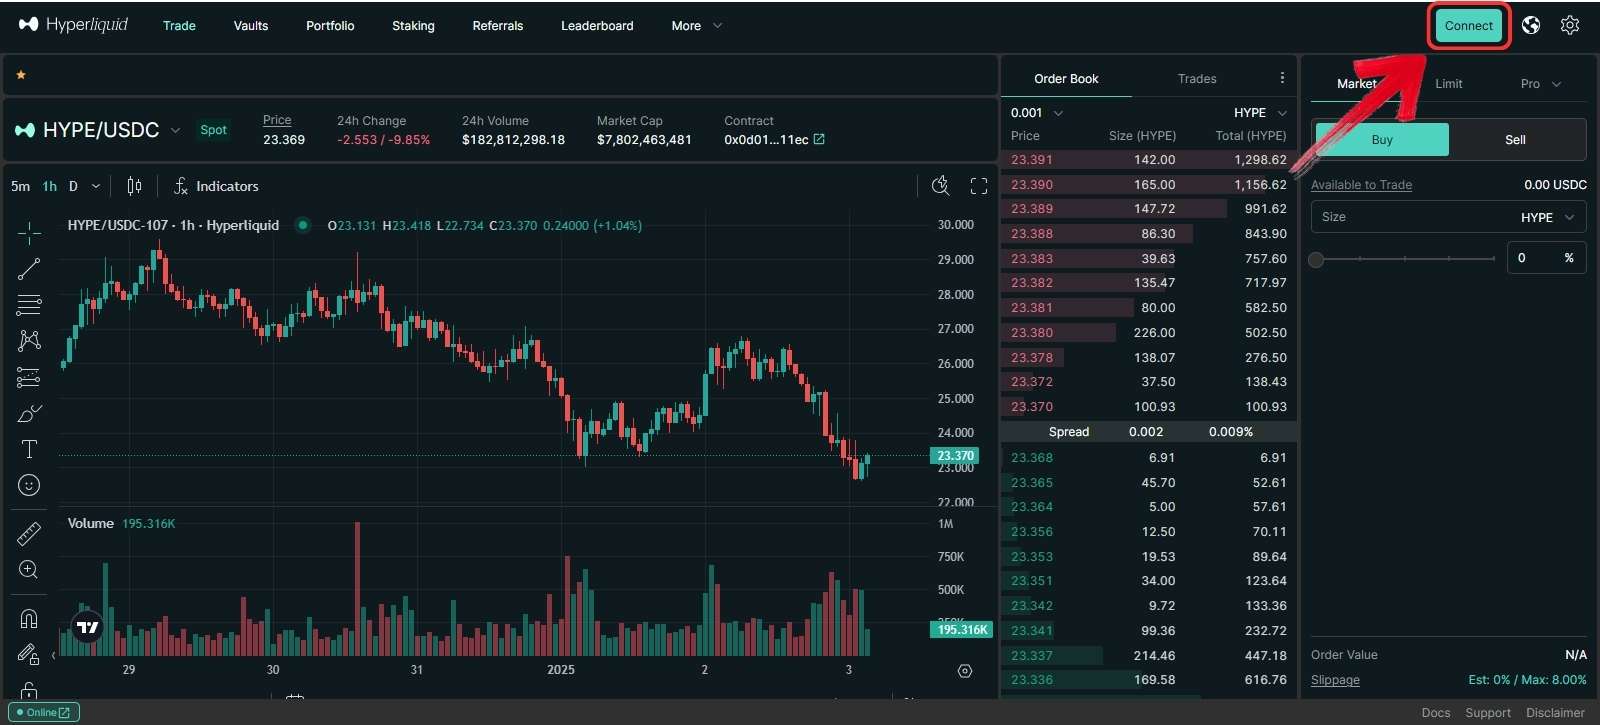
2. Once on the Hyperliquid platform, click on the “Connect” button and connect your Web3 wallet. For this guide, we will be using the MetaMask wallet.
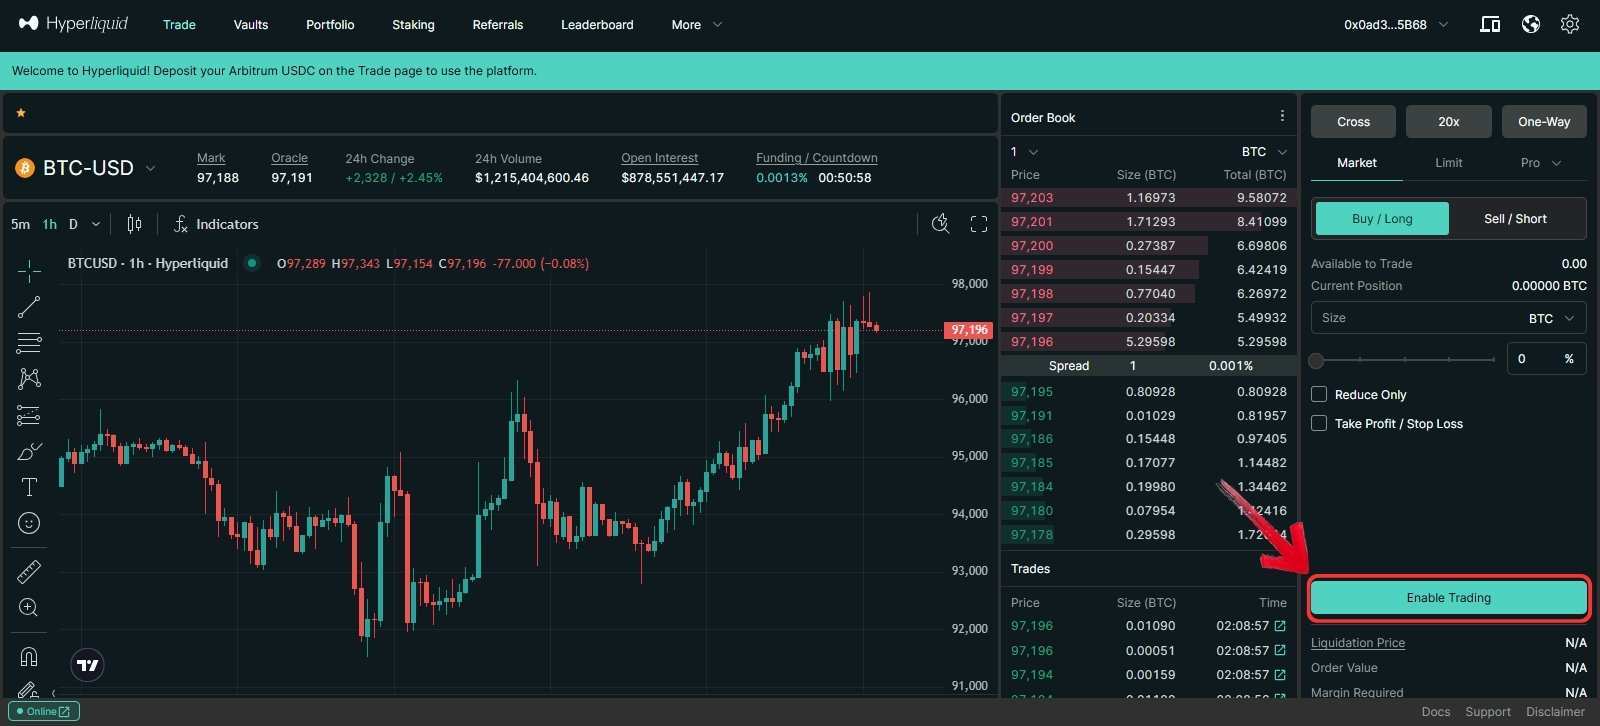
3. With the wallet connected, click on the “Enable Trading” button and deposit funds into your Hyperliquid L1 wallet from your MetaMask wallet.
With the funds now transferred to your Hyperliquid trading wallet, the next step is to purchase $HYPE tokens.
Watch our complete video tutorial on how to deposit funds on Hyperliquid.
Step 2: Transfer Funds to Spot Wallet
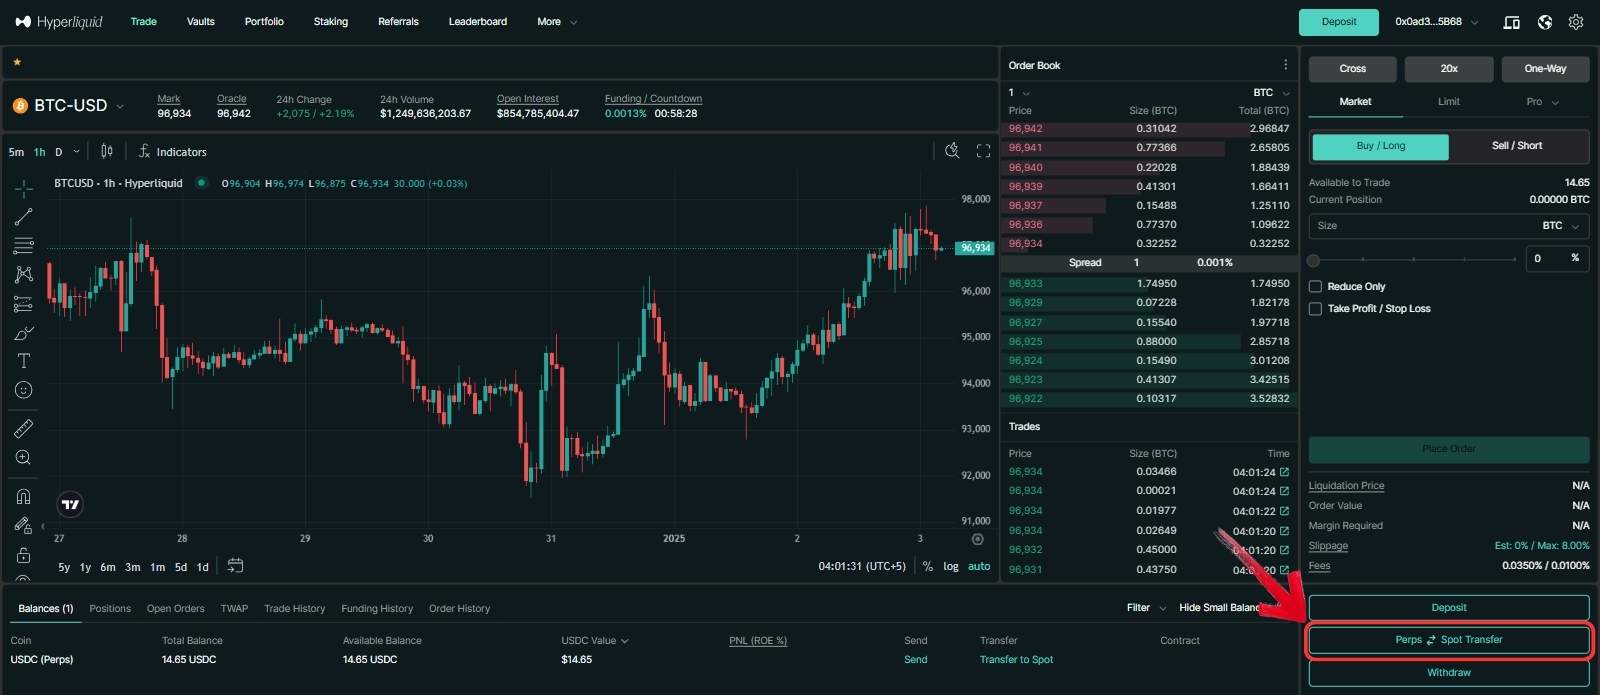
With the funds deposited on Hyperliquid, the next step is to ensure they are in your Spot Wallet so you can buy $HYPE tokens on the spot market. For this, we will simply transfer funds from Perps to Spot.
1. To transfer funds from Perps to Spot, click on the “Perps to Spot Transfer” button.
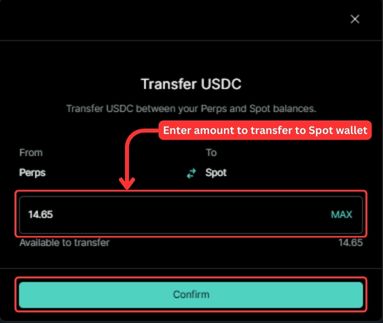
2. A “Transfer USDC” window will pop up. Ensure the flow of funds is set from “Perps” to “Spot” by clicking on the double-arrow icon.

3, Enter the amount you want to transfer to your Hyperliquid Spot Wallet and click the “Confirm” button.
With the funds now in your Spot Wallet, the next step is to buy $HYPE tokens on Hyperliquid.
Step 3: Buy $HYPE
Now, let’s buy some $HYPE tokens on the Hyperliquid spot market:
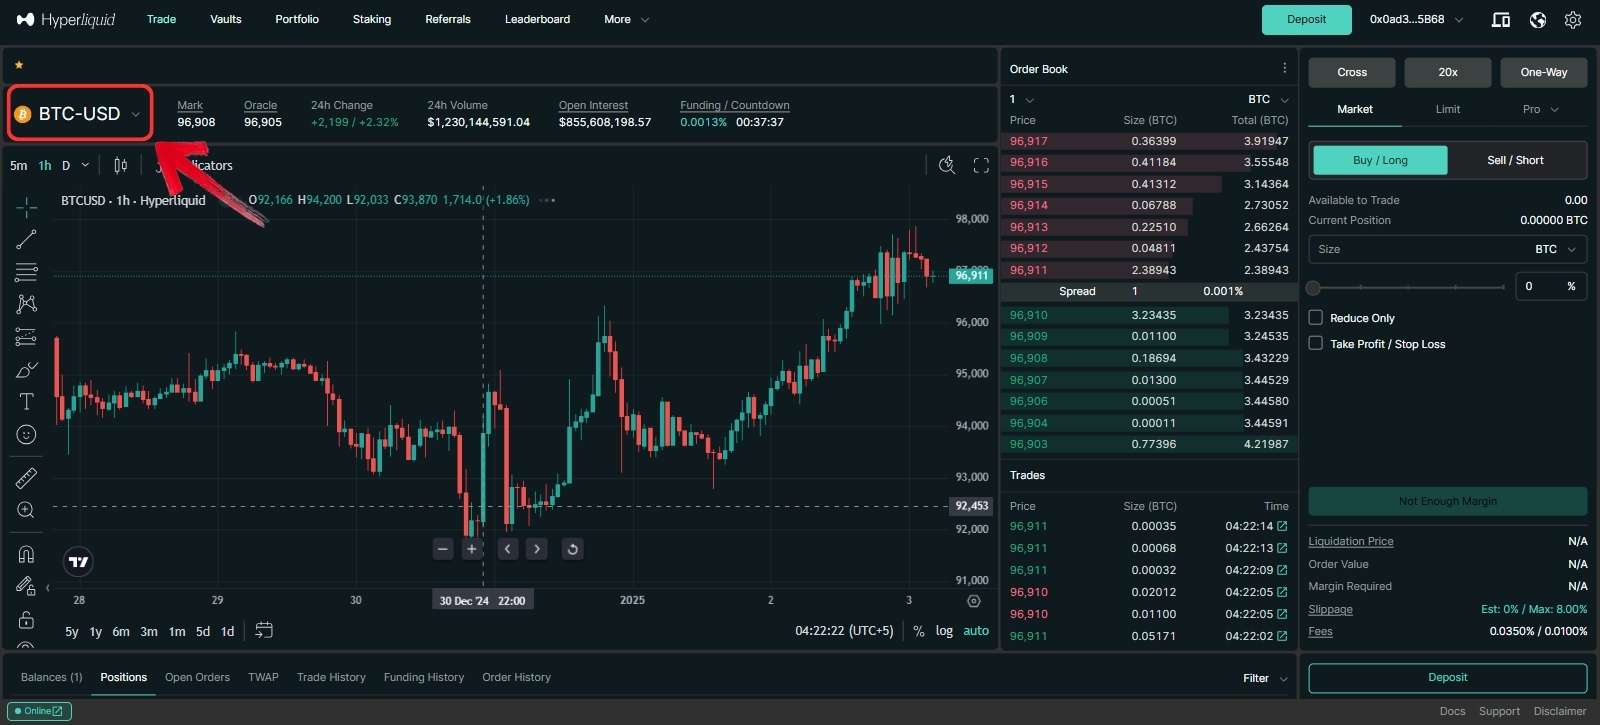
1. To begin, click on the Asset List Panel located at the top-left corner of the platform.
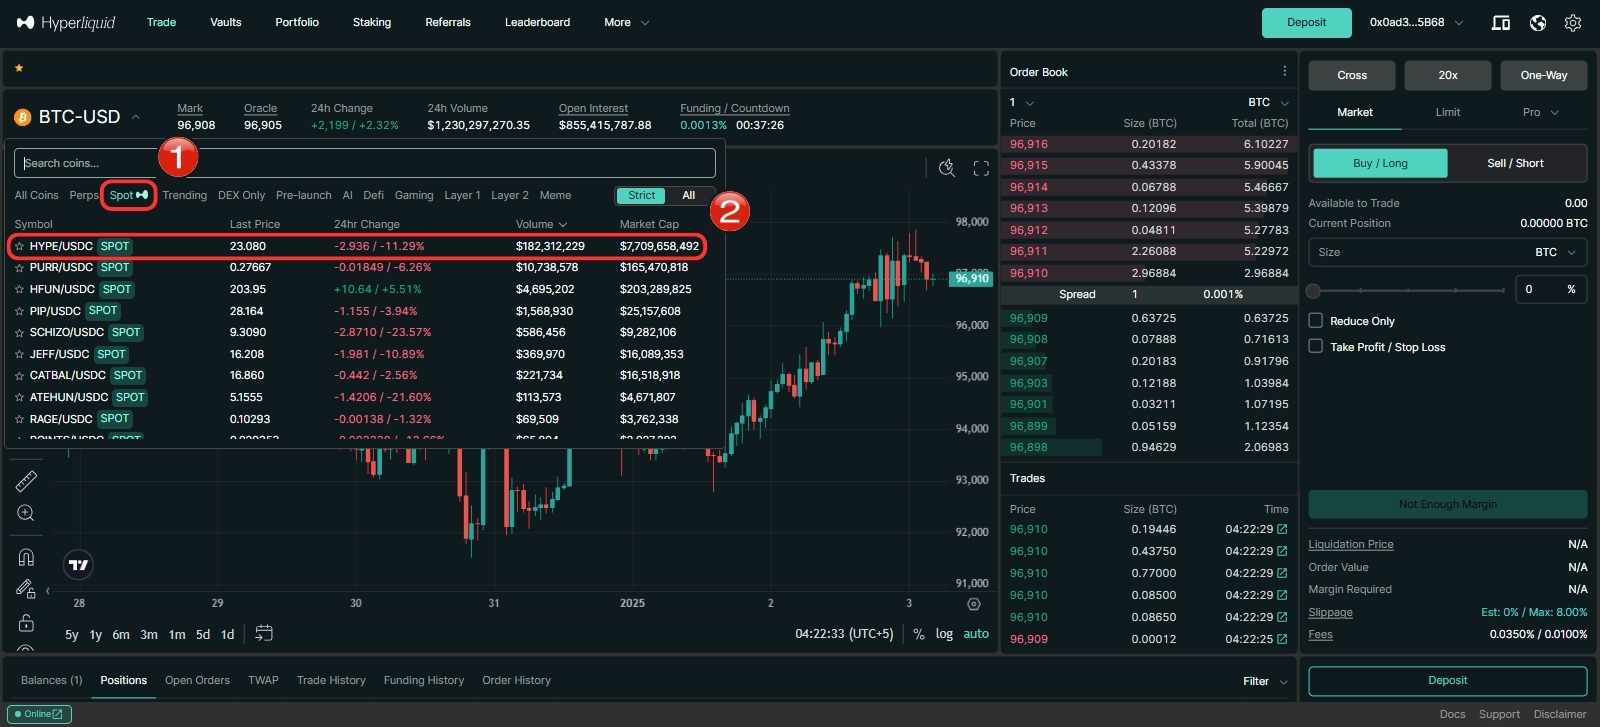
2. In the Asset List Panel, select the “Spot” tab to view the spot market, and then choose “HYPE” from the list of tokens.
3. Next, go to the Trading Tool Panel on the right. This is where you can set up your buy order. Since we’re buying $HYPE tokens at market price, click on the “Market” option.
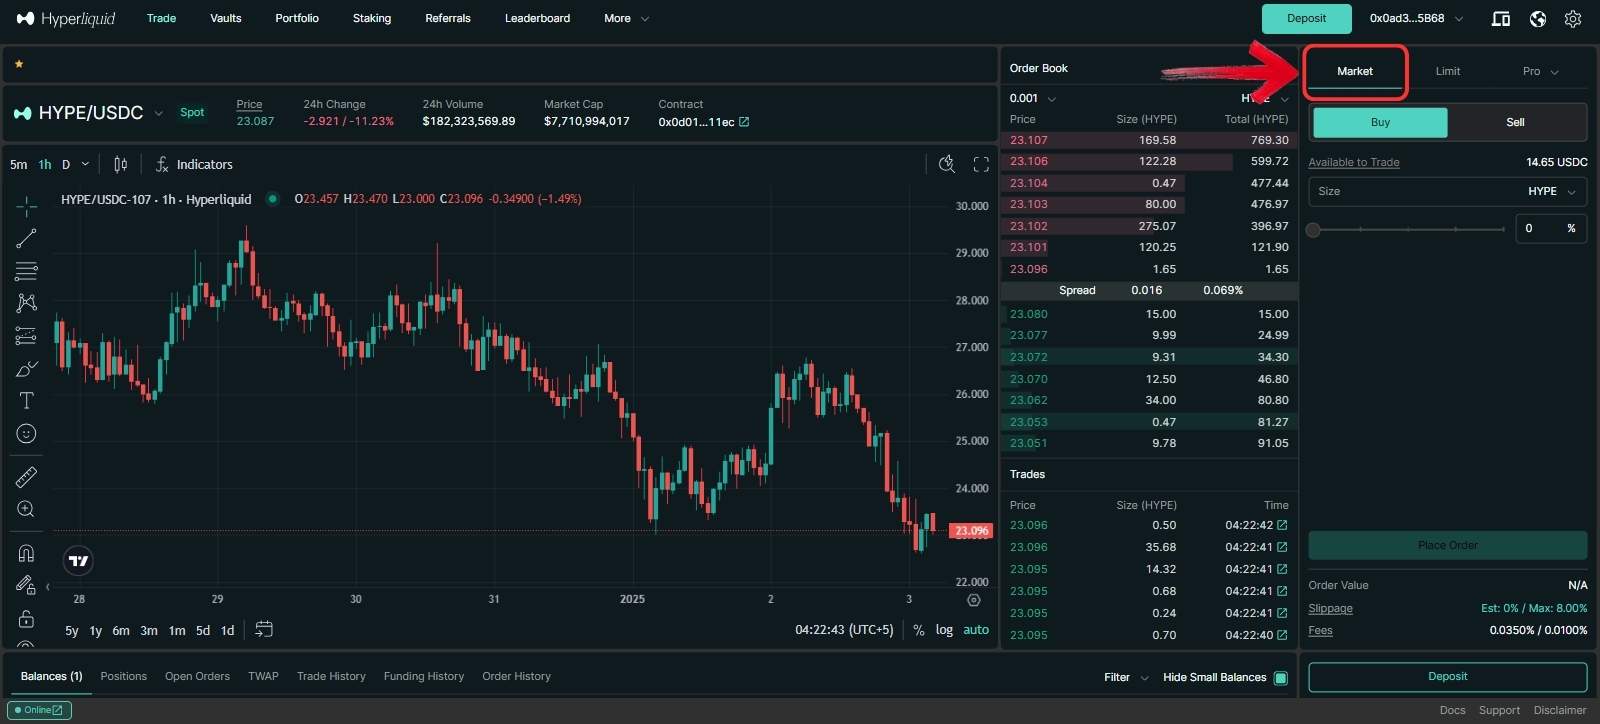
4. Use the toggle to adjust the amount of $HYPE tokens you want to purchase, or simply enter the desired amount manually.

5. Once your order is set, click the “Place Order” button to execute your buy order.
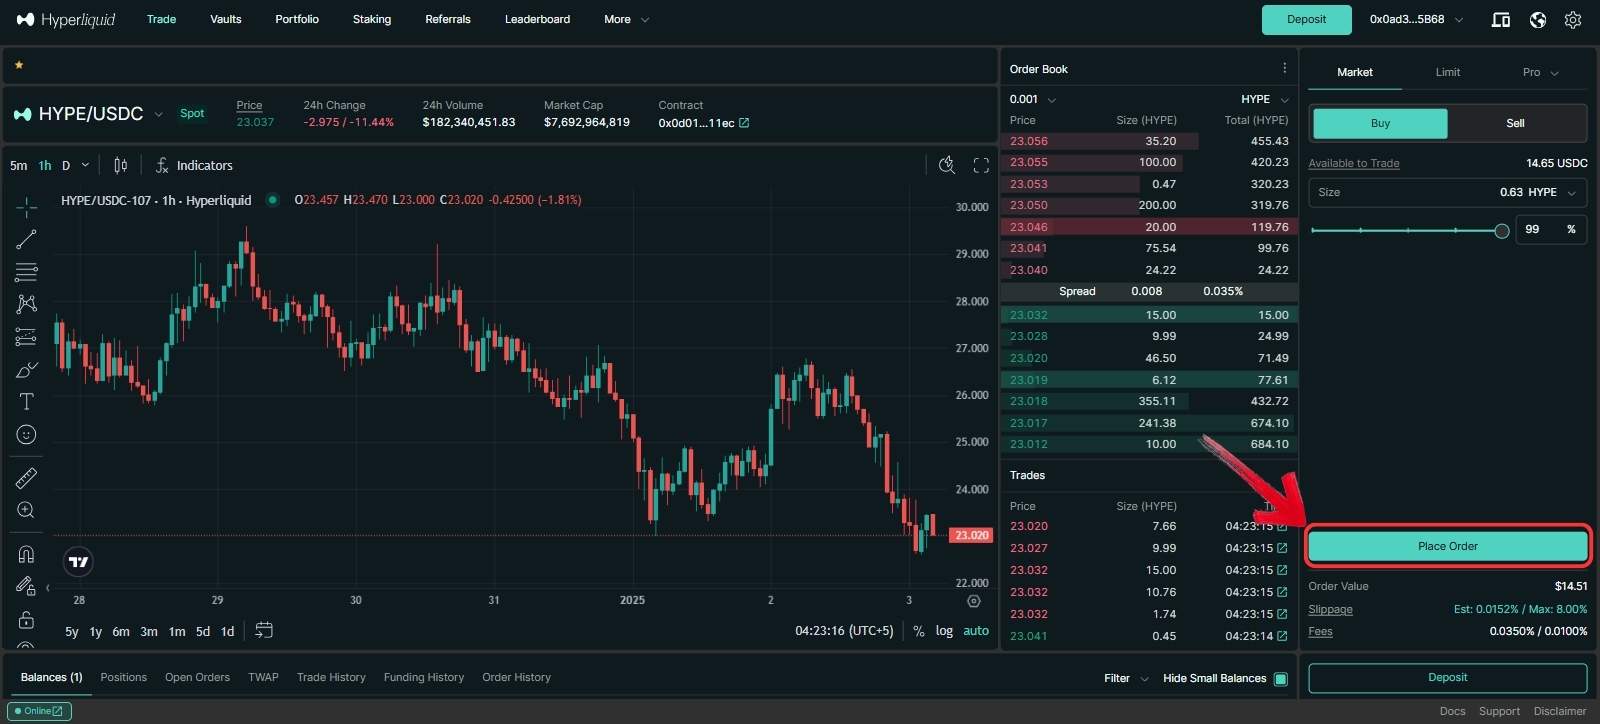
6. After the order is executed, click on the “Balances” tab located right below the trading chart to view your $HYPE tokens.

Step 4: Staking on Hyperliquid
With your $HYPE tokens purchased, you can now stake them on Hyperliquid to earn rewards. Let’s get started:
1. On the Hyperliquid trading platform, click on the “Staking” button located in the ribbon.
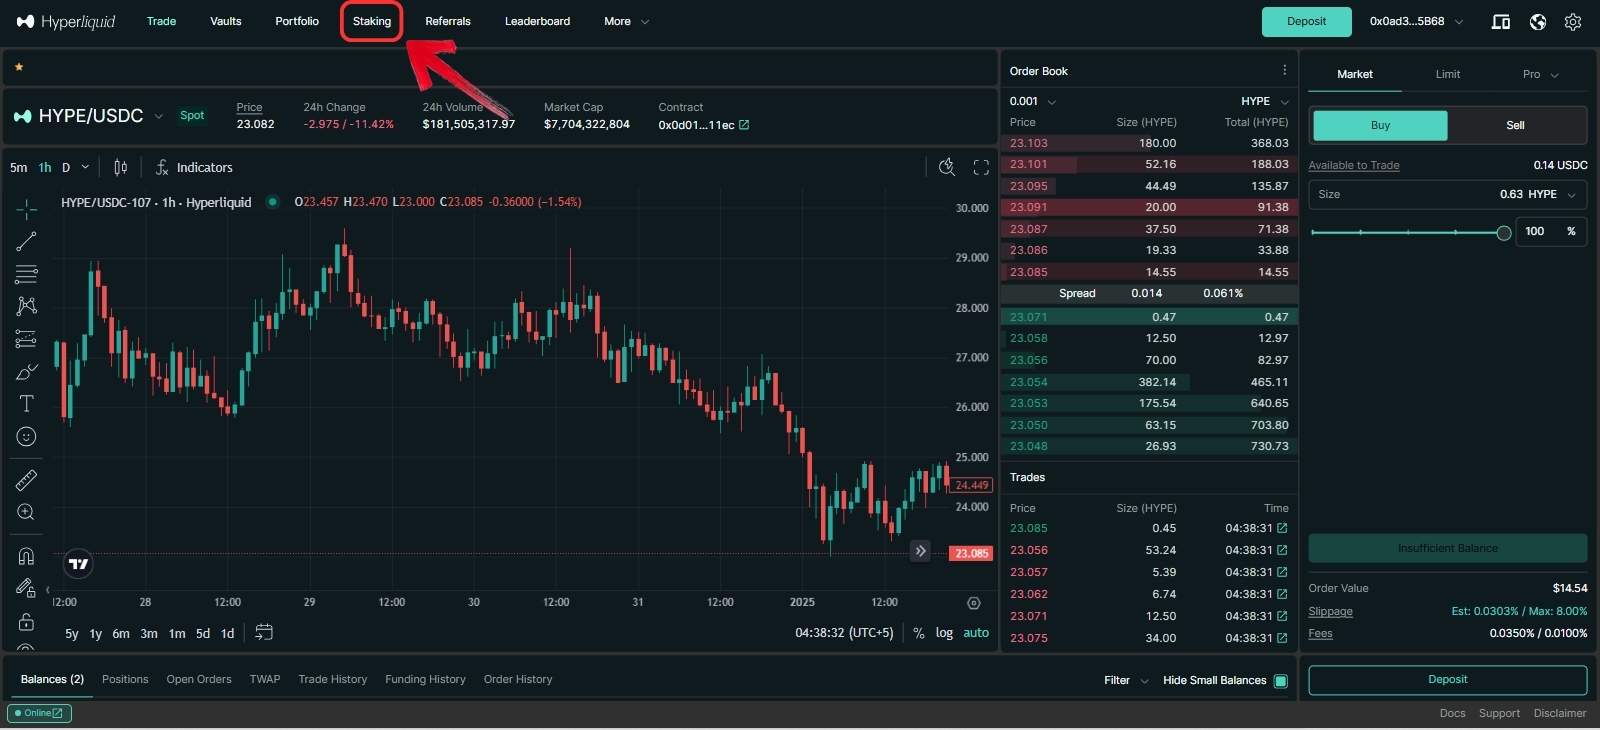
2. To begin staking, you first need to transfer your $HYPE tokens from the “Spot” wallet to the “Staking” wallet. Click on the “Spot to Staking Balance Transfer” button to proceed.
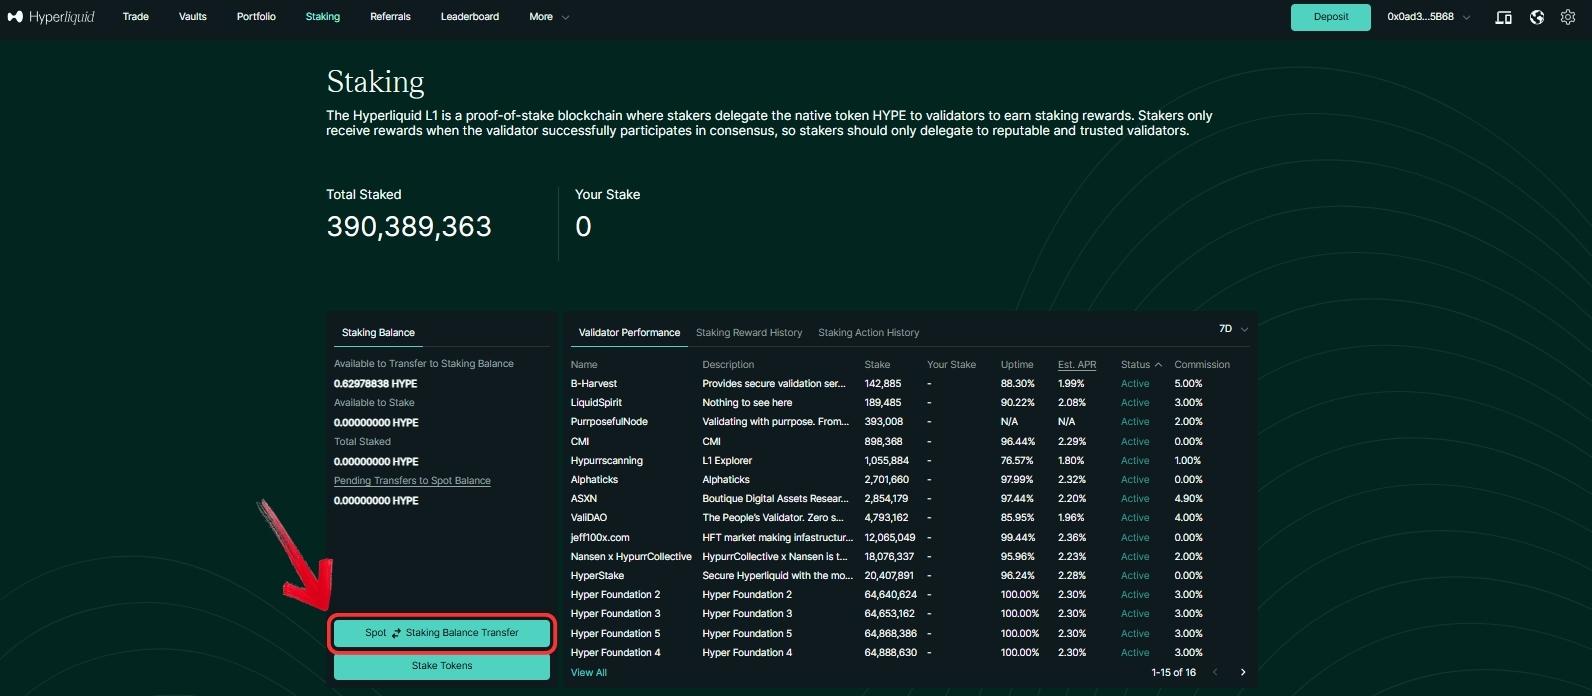
3. Enter the amount of $HYPE tokens you wish to stake and click “Confirm” to complete the transfer.
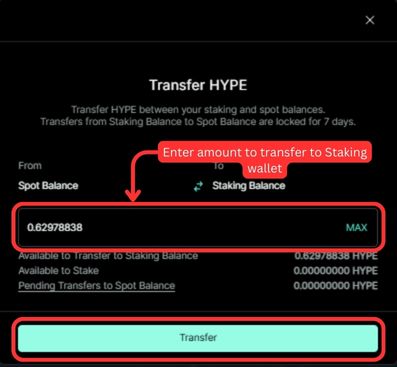
4. You will need to provide a signature to approve the transaction on your Web3 wallet, click on “Confirm” to proceed.

5. With your $HYPE tokens now in your staking wallet, browse through the list of available validators. Look for key parameters to evaluate them—for example, the “Uptime” parameter, which helps you gauge the reliability of a validator since your staking rewards depend on their uptime.
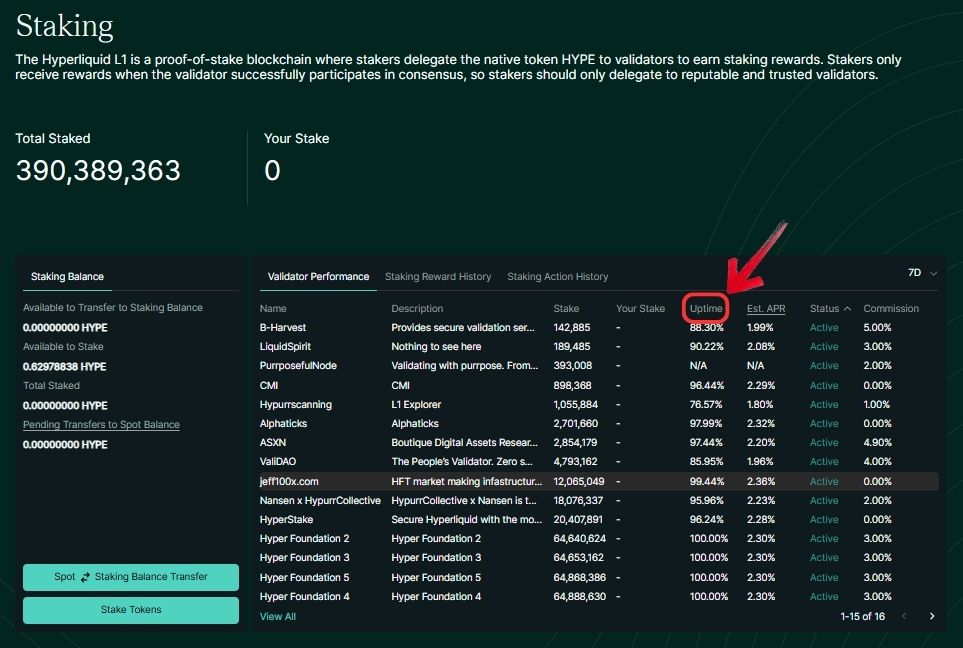
6. Click on the validator of your choice, enter the amount you wish to stake, and then click on “Stake” to confirm.
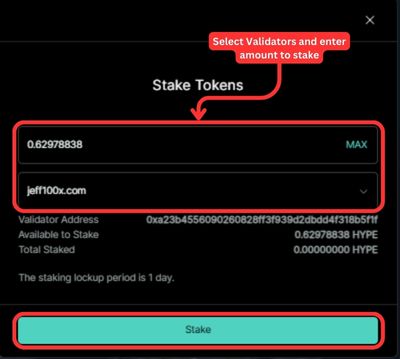
7. Next, your Web3 wallet extension will pop up to confirm the transaction. Click on “Confirm” to finalize staking your $HYPE tokens.

8. Once the staking is successful, you can view your rewards and staked amount on the Hyperliquid staking dashboard.
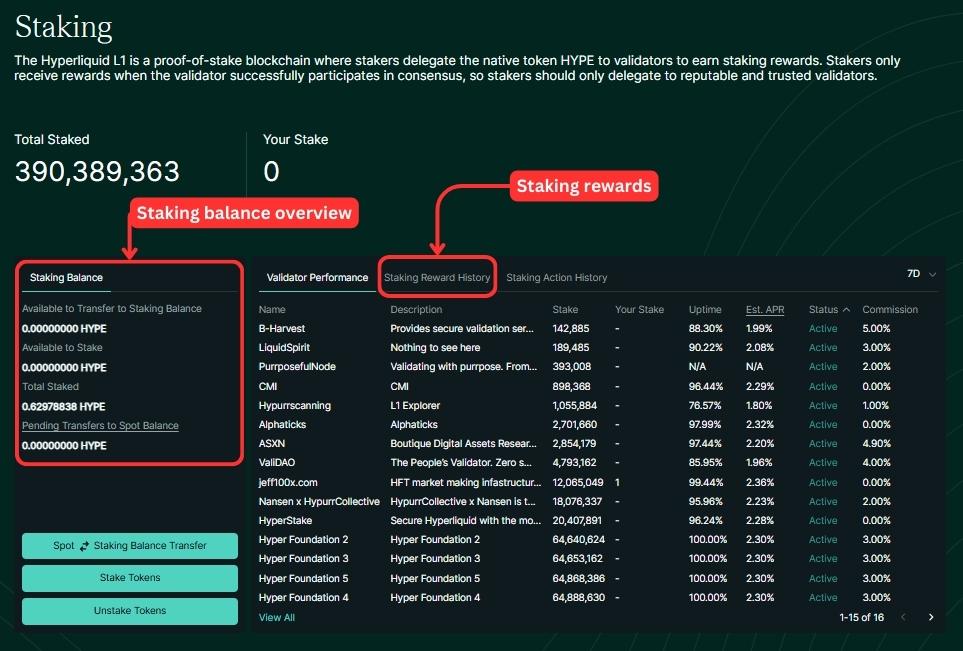
And that’s it! You’ve successfully started staking on Hyperliquid. Your rewards will automatically be transferred to your staking wallet as they become available.
How to Unstake Tokens on Hyperliquid
If you wish to unstake your tokens, follow these simple steps:
1. Navigate to your Hyperliquid Staking Dashboard and click on the “Unstake Tokens” button.
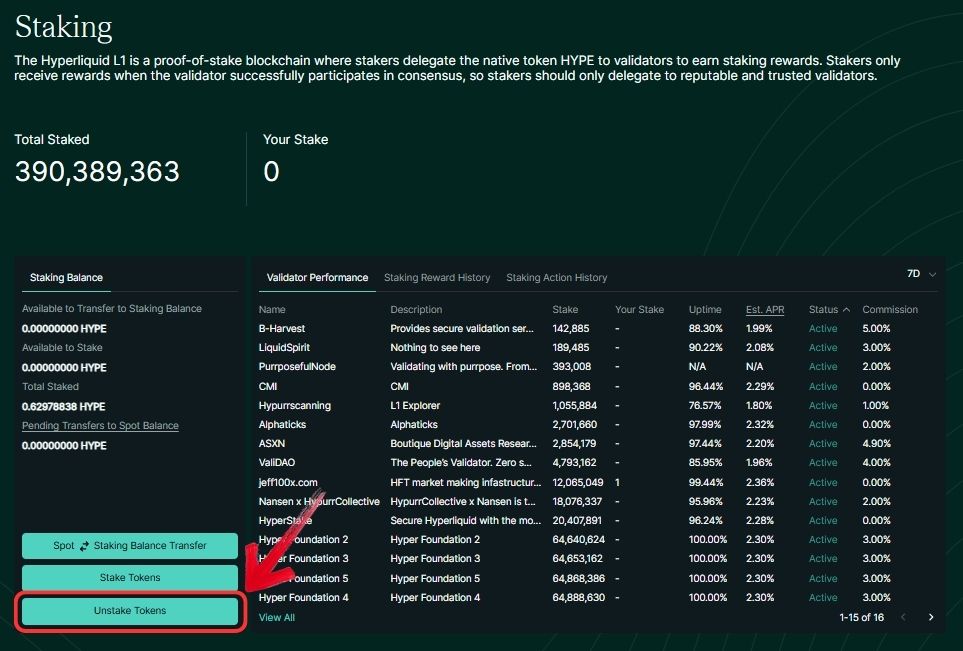
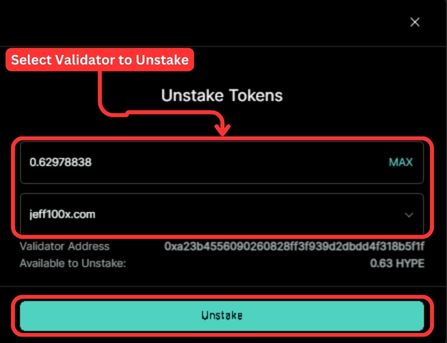
2. An Unstake Tokens window will pop up. Select the validator from which you want to unstake your tokens and enter the amount of $HYPE tokens you wish to unstake.
3. Once you’ve entered the details, click on “Unstake” to confirm the action.
Tips to Start Staking on Hyperliquid
- Exercise Caution: Since Hyperliquid is a new platform, it’s important to remain vigilant while staking.
- Verify Website Address: Always double-check the website URL before connecting your Web3 wallet to avoid phishing attempts.
- Factor in Trading Fees: Hyperliquid charges trading fees of 0.01% (maker) and 0.035% (taker). Be sure to account for these fees when buying $HYPE tokens.
- Choose Reputable Validators: Staking rewards are earned only when the validator successfully participates in consensus. Delegate your tokens to reputable and trusted validators.
- Lock-in Period: Once you stake $HYPE tokens, they cannot be withdrawn for at least 1 day.
- Evaluate Validators: Learn about the validators before staking. Check key parameters like Uptime (affects rewards), Commission (impacts your earnings), and Stake (reflects the trust others have in the validator).
- Variable Commissions: Different validators may charge different commission rates, so choose wisely.
Bottom Line
The staking platform on Hyperliquid is relatively new and has been attracting a significant number of users. Through staking, Hyperliquid not only adds utility to its native $HYPE token—enabling holders to earn rewards—but also takes steps toward greater decentralization by encouraging more validators to join and earn commissions.
Staking on Hyperliquid is straightforward, and with this step-by-step guide, you’ll easily navigate the platform and start staking your $HYPE tokens effortlessly.
FAQs
1. How are staking rewards calculated on Hyperliquid?
Rewards on Hyperliquid are inversely correlated with the square root of the total $HYPE staked. For instance, with 400 million tokens staked, the annual reward rate is approximately 2.37%. This model incentivizes broader participation while maintaining a sustainable reward structure.
2. Can I stake $HYPE tokens on multiple validators?
Yes, you can distribute your $HYPE tokens across multiple validators to diversify your staking strategy. This can help mitigate the risk of downtime or other issues with a single validator.
3. Is there a minimum amount of $HYPE tokens required for staking?
While individual validators must maintain a self-delegation of at least 10,000 $HYPE, there is no specified minimum for users to stake. However, ensure the amount you stake is worthwhile after considering transaction fees.
4. Can I unstake my $HYPE tokens anytime?
Unstaking is possible after a minimum lock-in period of 1 day. After this period, you can unstake your tokens via the staking dashboard and withdraw them back to your wallet.
5. Are staking rewards taxable in the US?
Yes, the IRS classifies staking rewards as taxable income upon receipt, valued at their market price when created.

