Beam has quickly become a leading Ethereum Layer 2 scaling solution in gaming, partnering with various projects and gaining significant attention. Many users are searching for ways to bridge to Beam to access its ecosystem and interact with dApps. This guide explores bridges that allow you to connect to Beam from both EVM-compatible and non-EVM blockchains like Solana and Polkadot.
Can I Bridge to Beam from Other Networks?
Yes, you can! Bridging to Beam is easy with cross-chain bridges or bridge aggregators. Cross-chain bridges let you connect your wallet and bridge to Beam with lower fees since they only charge network and platform fees. Bridge aggregators, like MetaMask, help you find the best routes but often come with slightly higher fees.
Just remember a few things: make sure your wallet is compatible, you have enough #BEAM tokens for gas fees, and that you’ve added the Beam network to your wallet. You can buy #BEAM tokens on platforms like Coinbase or Binance to cover those gas fees.
How to Bridge to Beam
When it comes to bridging, EVM compatibility is key! Beam network is an EVM-compatible blockchain, so you’ll need bridges that allow you to move assets from other EVM-compatible blockchains like Avalanche, Binance Smart Chain, or Layer 2 solutions like Arbitrum or Optimism.
However, not all cross-chain bridges support bridging from non-EVM blockchains to EVM-compatible ones, such as from Solana to Beam. As of now, there isn’t a direct solution available because not many cross-chain bridges support the Beam network. However, there is a workaround, which we’ll explore next. Let’s get into the cross-chain bridges that can help you bridge to Beam and interact with its blockchain.
Using Beam Bridge
To bridge to Beam, we will use the Beam Bridge, which is built on the LayerZero protocol. This bridge supports transfers from over six blockchains to Beam’s main network. LayerZero is an omnichain interoperability protocol that helps connect Beam to various networks, making it possible to move tokens and NFTs across chains. As always, when bridging assets, be sure to double-check all details and understand the associated risks before proceeding.
Here are the steps to use the Beam Bridge to bridge to the Beam network:
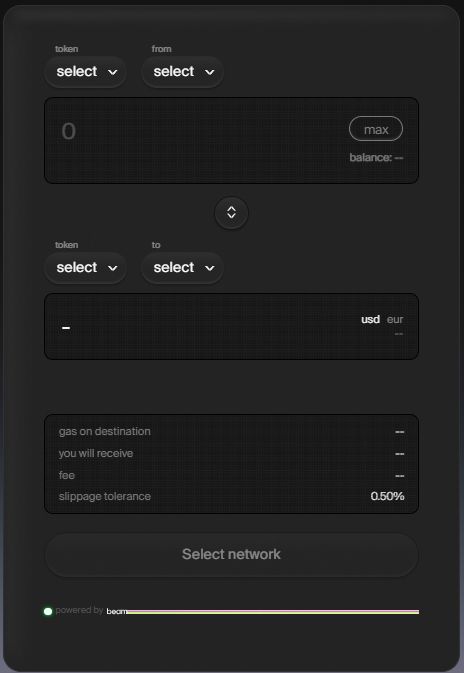
Step 1: Go to the official Beam Bridge page, where you can start the bridging process.
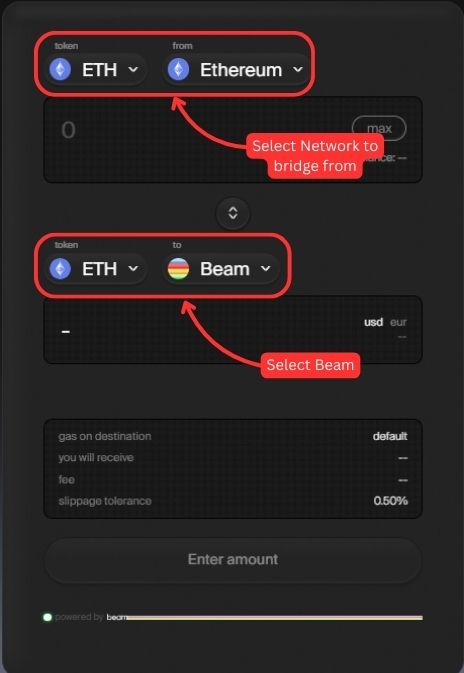
Step 2: Next, in the From field, select the blockchain from which you want to bridge your asset and choose the token you wish to bridge to Beam.
Step 3: Once the blockchain is selected, the To field will automatically populate with the Beam network. You can then select the token you wish to receive.
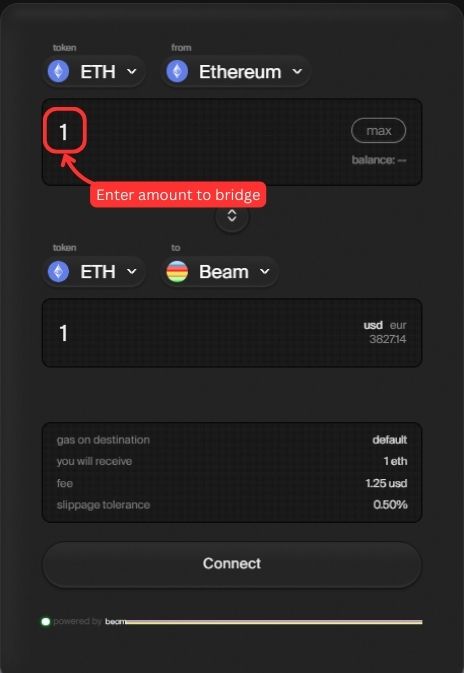
Step 4: Enter the amount of the selected token that you want to bridge to Beam.
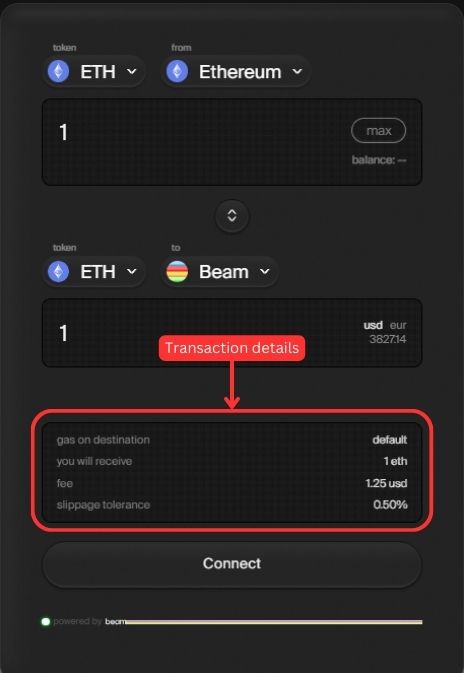
Step 5: Your transaction details will appear. Double-check the transaction details, including the amount and network fees. Make sure you have enough #BEAM tokens for gas fees.
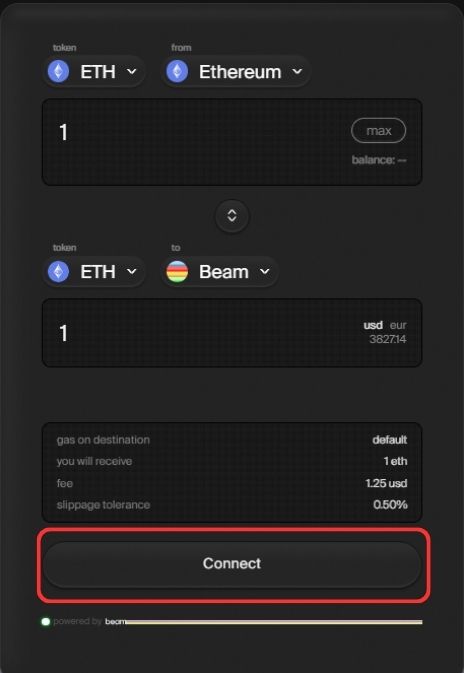
Step 6: Now, click on the “Connect” button to connect your wallet, such as MetaMask, that supports the network you’re bridging from (e.g., Avalanche, Binance Smart Chain, etc.).
Step 7: Once the wallet is connected, click on the “Continue” button to proceed with the transaction.
The Beam Bridge has its limitations, but being the only secure bridge available, it is the best option for bridging to Beam and exploring the network and its various dApps.
Bridge to Beam from Non-EVM Compatible Blockchains
Bridging from non-EVM compatible blockchains to the Beam network can be tricky. The available bridges aren’t very trusted, and the trusted cross-chain bridges don’t support the network. In such cases, the best route is to use a bridge like Allbridge if you’re looking to bridge from a blockchain like Solana to Beam. Here’s how you can do this:
Step 1: Open your browser and navigate to the Allbridge website.
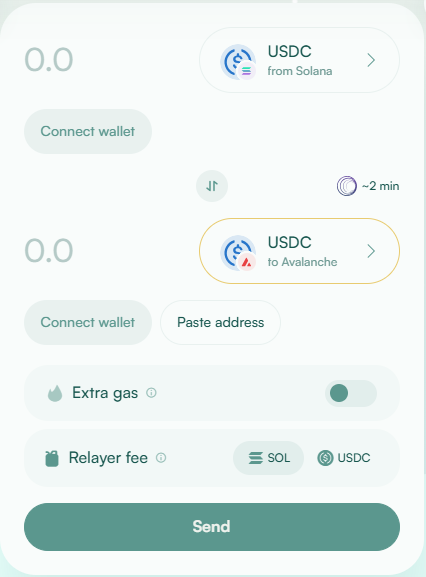
Step 2: Select Solana and bridge your tokens to one of the following blockchains:
- Arbitrum
- Ethereum
- Binance Smart Chain
- Avalanche
Step 3: Once you have connected your wallet and bridged your assets from Solana to any of the mentioned blockchains, close Allbridge.
Step 4: Head over to the Beam Bridge and follow the steps to bridge to the Beam network.
The process can be lengthy, but if you’re really looking to bridge assets to the Beam network, this method will help you get the job done.
About Beam
Beam, formerly known as Merit Circle, is a top-tier gaming crypto project that is rapidly growing within the blockchain gaming space. Built as a subnet on the Avalanche network, it offers a secure and scalable platform for game developers. The Beam blockchain uses a Proof of Authority (PoA) consensus model, with validators selected based on their trustworthiness, ensuring a highly secure and scalable environment.
The Beam ecosystem includes a variety of features such as the Beam Hub, Sphere Market, and the Beam Companion app. Users can interact with in-game assets, access NFT marketplaces, and track their gaming assets.
The Beam token is the key utility and governance token required for all gas fees and transactions within the ecosystem. Beam allows gamers to vote on development proposals and manage governance within the Merit Circle DAO. It’s also integral to the functioning of the Beam blockchain and rewards validators for maintaining the network.
Bridging to Beam offers users faster, more secure transactions on a scalable network, along with access to Beam’s growing gaming ecosystem. Gamers can seamlessly interact with assets, engage in decentralized applications, and participate in governance.
Key Advantages of Beam
- Scalability and Security: Built on Avalanche’s high-performance network, Beam offers fast and secure transactions.
- Developer-Friendly: With EVM compatibility, Beam allows seamless migration of Ethereum-based projects, making it easy for developers to build and deploy games.
- Governance and Rewards: The Beam token ($BEAM) is integral to governance, enabling users to vote on proposals and rewarding validators for maintaining network integrity.
- Innovative Ecosystem: Beam includes features like the Beam Hub, Sphere Market, and Beam Companion app, enhancing user interaction with in-game assets and NFT marketplaces.
Beam Bridging Fees
When using BeamBridge to transfer assets, you’ll encounter a few key fees. The “Gas on Destination” feature allows you to add BEAM tokens during the bridging process, ensuring you have enough native assets on the destination network to cover transaction costs. For example, if you’re bridging USDC from Ethereum to Beam, you can set an additional amount of BEAM tokens to cover gas fees once your assets arrive. Along with this, LayerZero’s bridging fee applies depending on the token and destination network. Always check the displayed fees on the BeamBridge platform, and be mindful of standard network transaction fees that might also apply during the transfer.
Bottomline
Bridging to Beam is a straightforward process that opens up access to a fast, secure, and scalable blockchain for gaming and dApp interaction. Whether you’re looking to explore Beam’s growing ecosystem or engage with blockchain gaming, the Beam Bridge offers a reliable way to transfer assets. With EVM compatibility and cross-chain support, Beam makes it easy to get started. Just make sure you have enough BEAM tokens for gas fees and follow the simple steps to bridge your assets.
FAQs
1. What makes Beam unique compared to other EVM-compatible blockchains?
Beam is built as a subnet on the Avalanche network, leveraging Avalanche’s high-performance scalability and security. It caters specifically to the gaming ecosystem with features like Beam Hub, Sphere Market, and a dedicated companion app, making it highly developer- and user-friendly.
2. How can I add the Beam network to MetaMask?
To add Beam to MetaMask:
- Open MetaMask and click Add Network.
- Enter Beam’s RPC details (available on the official Beam website).
- Confirm to save and switch to the Beam network.
3. How is Beam suited for blockchain gaming?
Beam offers a scalable, secure environment tailored for gaming, with developer-friendly EVM compatibility, low transaction fees, and support for in-game assets like NFTs and tokens. Its unique tools, like Sphere Market and Beam Hub, enhance gaming interactions.
4. What are OFTs?
OFTs, or Omnichain Fungible Tokens, are a special kind of digital token that can move easily between different blockchains. Imagine you have a game character or a coin in one game, and you want to use it in another game. Normally, you’d need to exchange or transfer it, which could take time or cost extra fees. But with OFTs, you can send your token directly from one blockchain to another, just like moving something between two different apps on your phone, without paying extra fees or needing special help. This makes them really useful and flexible for all kinds of digital activities.
5. Can I bridge NFTs to Beam?
Yes, the Beam Bridge supports transferring NFTs from compatible blockchains. Ensure the NFT’s standard and the originating blockchain are supported by LayerZero to avoid errors.


![How to Change the Language in Phantom [2026]](https://www.cryptowinrate.com/wp-content/uploads/2026/02/How-to-Change-the-Language-in-Phantom-2026-1024x576.jpg)